[Android][Kotlin] 코틀린 RecyclerView(1)
by Yena Choi
마지막 수정 : 2018-06-29
ListView와 RecyclerView
ListView에서는 모든 데이터에 대한 View를 만들고, View가 사라졌다가 나타날 때마다 리소스를 불러와야 한다. 예를 들어, 화면을 아래로 스크롤 했다가 다시 위로 올릴 때마다 리소스를 불러오게 된다. 이 방법은 많은 메모리와 저장 공간을 사용하므로, 대용량의 데이터를 이용하면 앱이 느려지거나 충돌할 가능성이 있다.
RecyclerView는 ListView의 단점을 보완하기 위해 만들어졌다. ViewHolder를 필수적으로 사용해야 하고 LayoutManager를 설정하는 등 조금 더 복잡할 수 있지만, 앱에서 불필요하게 메모리를 사용하는 일은 줄어들 것이다.
안드로이드 리사이클러뷰를 사용하기 위해 준비해야 할 것을 정리해보았다.
- Gradle에서 Implement 추가
- 데이터 클래스 정의
- 레이아웃에 RecyclerView 추가
- item 생성
- 어댑터 생성
- 어댑터 설정
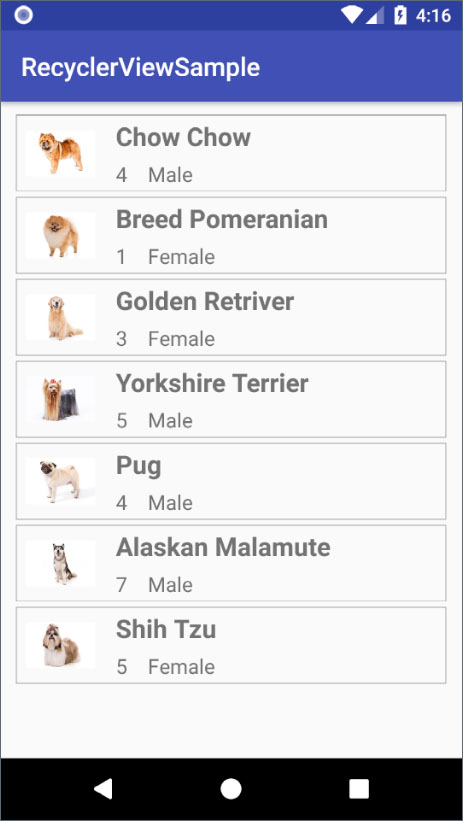
이 예제는 다음과 같은 Dog List App의 화면을 만드는 것을 목표로 했다.
1. Gradle에서 Implementation 추가
RecyclerView는 기본 API에 제공되어 있지 않기 때문에, Support Library 추가를 해야 사용할 수 있다. 좌측의 Gradle Scrpits - build.gradle (Module: app)경로로 파일을 열어서 dependencies 안에 compile implementation을 추가해야 한다. 안드로이드 스튜디오 3.0 이후부터는 compile 대신 implementation을 사용한다.

implementation 'com.android.support:recyclerview-v7:26.1.0'
gradle 파일을 수정하고 나면 우측 상단의 Sync Now 를 눌러서 설정을 업데이트 한다.
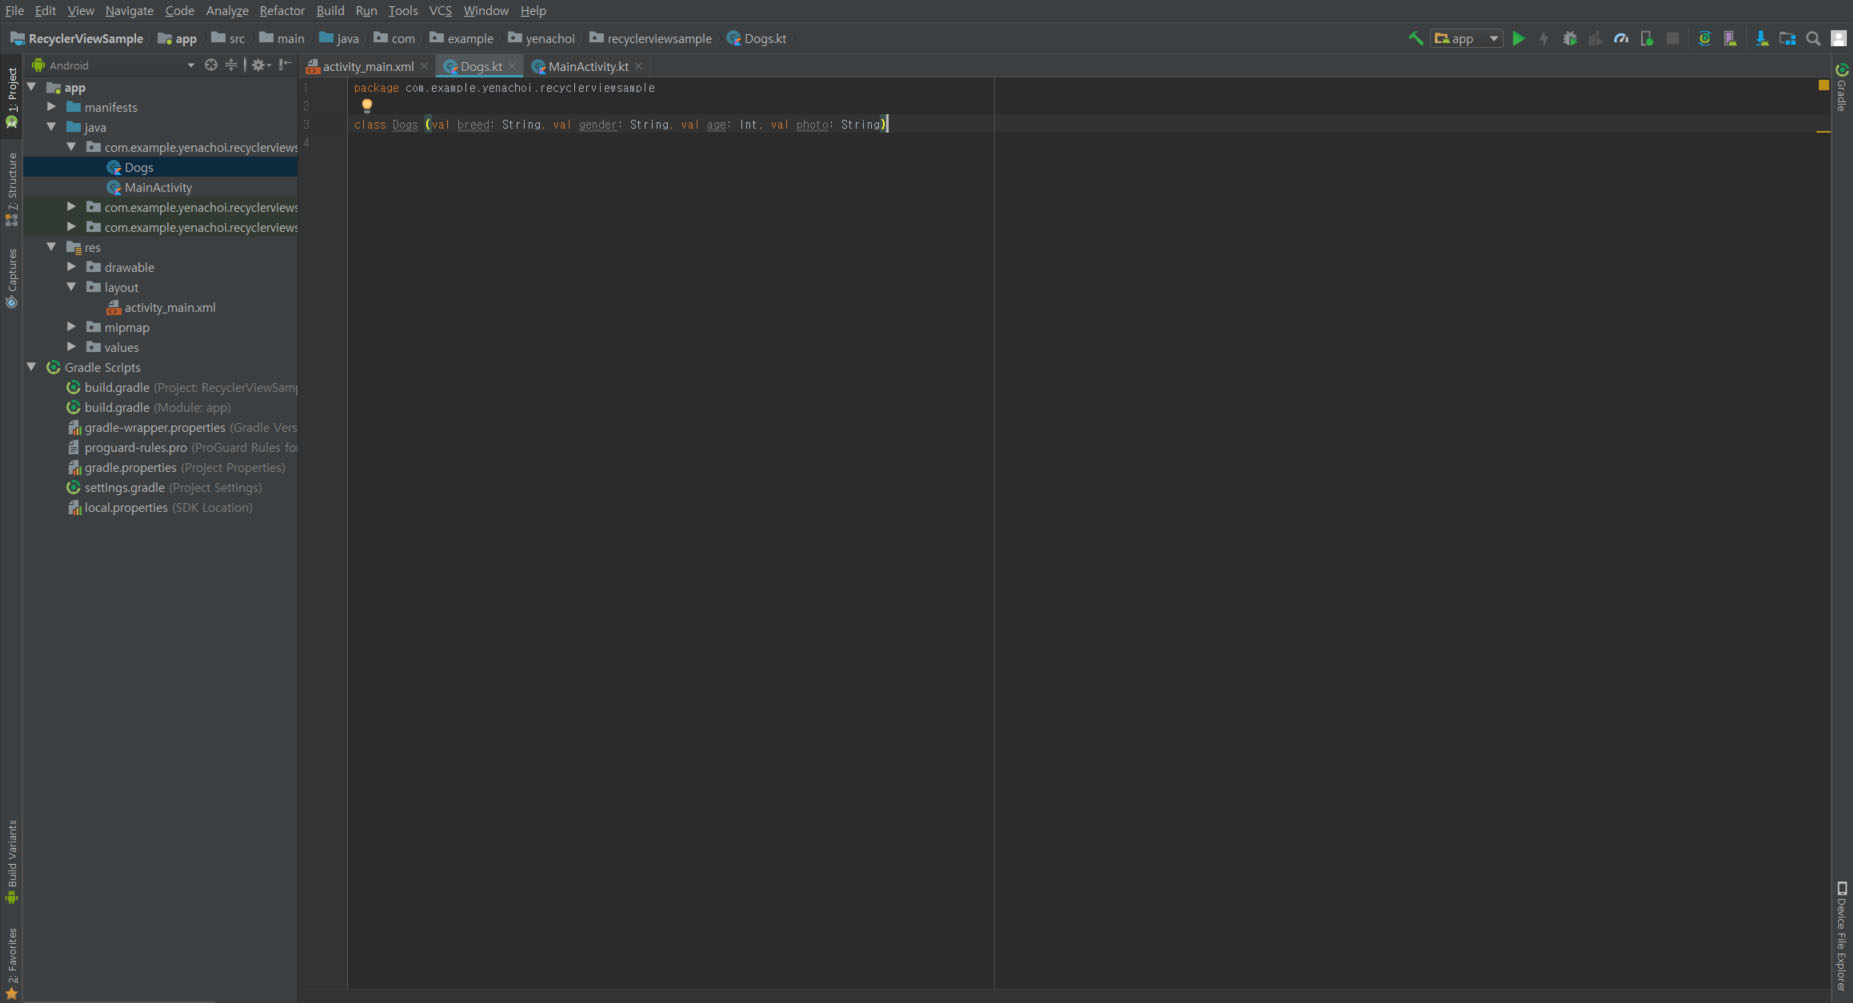
2. 데이터 클래스 정의
본 예제에서는 개의 목록을 나타내는 RecyclerView를 만들기 때문에 Dog.kt 이름의 클래스 파일을 만들었다. 변수는 breed, gender, age, photo로 구성하였다. 여기서 photo는 drawable에 들어갈 이미지 파일의 이름이며, 이후에 이 변수를 통해 drawable에서 이미지를 불러올 수 있게 된다.
/* Dog.kt */

class Dog (val breed: String, val gender: String, val age: String, val photo: String)
그리고, 실제 변수를 초기화한 후 개의 목록을 가지고 있을 ArrayList를 MainActivity에 추가해준다. 우선 빈 ArrayList 하나를 생성한다.
/* MainActivity.kt* /

var dogList = arrayListOf<Dog>()
3. 레이아웃에 RecyclerView 추가
Gradle에 제대로 추가했다면, <android.support.v7.widget.RecyclerView> 경로를 통해 RecyclerView를 레이아웃에 추가할 수 있다. activity_main.xml 에 RecyclerView를 추가했다.
<?xml version="1.0" encoding="utf-8"?>
<android.support.constraint.ConstraintLayout
    xmlns:android="http://schemas.android.com/apk/res/android"
    xmlns:tools="http://schemas.android.com/tools"
    android:layout_width="match_parent"
    android:layout_height="match_parent"
    tools:context=".MainActivity">

    <android.support.v7.widget.RecyclerView
        android:layout_width="match_parent"
        android:layout_height="match_parent"
        android:id="@+id/mRecyclerView"
        android:layout_marginStart="8dp"
        android:layout_marginEnd="8dp"
        android:layout_marginTop="8dp"
        android:layout_marginBottom="8dp">
    </android.support.v7.widget.RecyclerView>

</android.support.constraint.ConstraintLayout>
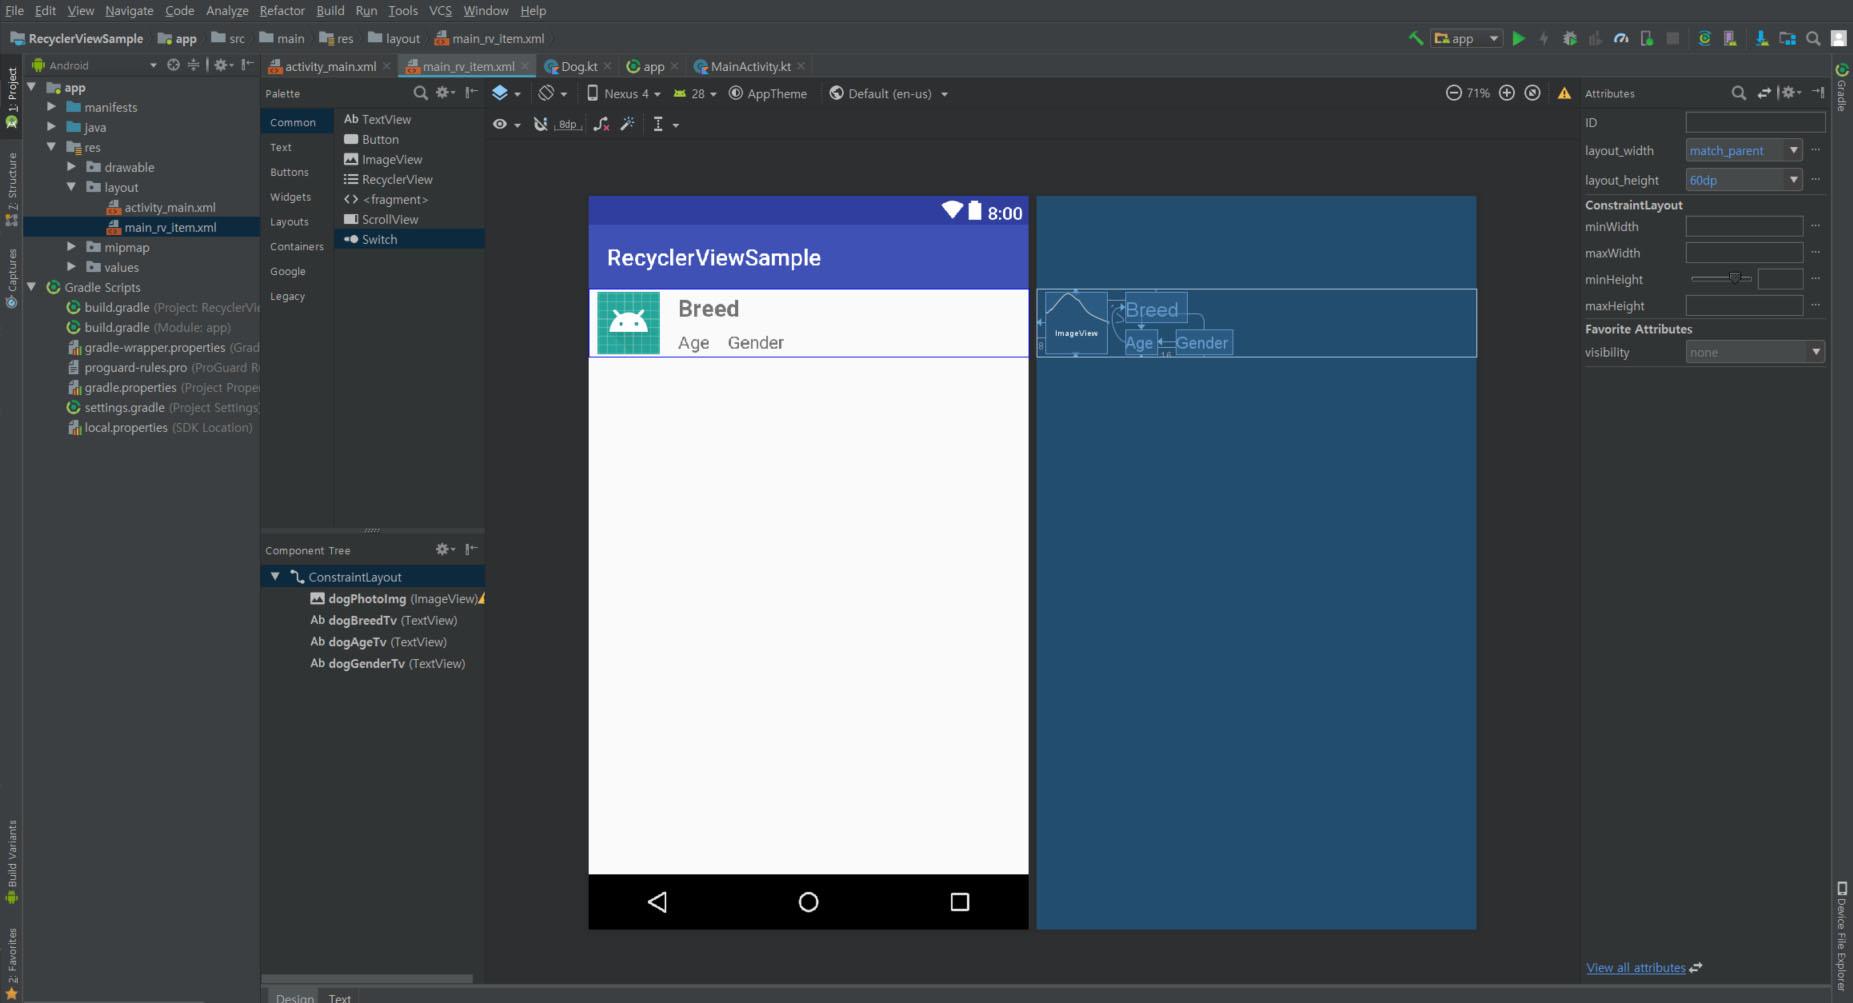
4. item 생성
다음으로 RecyclerView의 항목 하나하나를 담당할 item 뷰를 만든다. res-layout 경로를 우클릭하여 새로운 xml 파일을 생성해준다. 여기서는 main_rv_item.xml 파일을 만들어서 왼쪽에 사진, 상단에 종류, 하단에 나이와 성별이 오도록 커스텀했다.
그리고 item의 테두리를 주기 위해서 res-drawable에 item_border.xml 파일을 만들고, 사각형 테두리를 포함한 도형을 그렸다. 이후 main_rv_item 의 parent에 android:background="@drawable/item_border" 옵션을 주면 테두리가 적용된다.
<!--item_border.xml-->
<?xml version="1.0" encoding="utf-8"?>
<selector xmlns:android="http://schemas.android.com/apk/res/android">
    <item>
        <shape
            android:shape="rectangle">
            <stroke
                android:width="0.5dp"
                android:color="#8f8f8f" />
        </shape>
    </item>
</selector>
<!--main_rv_item.xml-->
<?xml version="1.0" encoding="utf-8"?>
<android.support.constraint.ConstraintLayout xmlns:android="http://schemas.android.com/apk/res/android"
    android:layout_width="match_parent"
    android:layout_height="60dp"
    xmlns:app="http://schemas.android.com/apk/res-auto"
    xmlns:tools="http://schemas.android.com/tools"
    android:background="@drawable/item_border"
    android:layout_marginTop="2dp"
    android:layout_marginBottom="2dp"
    android:layout_marginStart="4dp"
    android:layout_marginEnd="4dp">

    <ImageView
        android:id="@+id/dogPhotoImg"
        android:layout_width="54dp"
        android:layout_height="54dp"
        android:layout_marginBottom="4dp"
        android:layout_marginStart="8dp"
        android:layout_marginTop="4dp"
        app:layout_constraintBottom_toBottomOf="parent"
        app:layout_constraintStart_toStartOf="parent"
        app:layout_constraintTop_toTopOf="parent"
        app:srcCompat="@mipmap/ic_launcher_round" />

    <TextView
        android:id="@+id/dogBreedTv"
        android:layout_width="wrap_content"
        android:layout_height="wrap_content"
        android:layout_marginStart="16dp"
        android:textSize="20sp"
        android:textStyle="bold"
        app:layout_constraintStart_toEndOf="@+id/dogPhotoImg"
        app:layout_constraintTop_toTopOf="@+id/dogPhotoImg"
        tools:text="Breed"/>

    <TextView
        android:id="@+id/dogAgeTv"
        android:layout_width="wrap_content"
        android:layout_height="wrap_content"
        android:textSize="16sp"
        app:layout_constraintBottom_toBottomOf="@+id/dogPhotoImg"
        app:layout_constraintStart_toStartOf="@+id/dogBreedTv"
        tools:text="Age" />

    <TextView
        android:id="@+id/dogGenderTv"
        android:layout_width="wrap_content"
        android:layout_height="wrap_content"
        android:layout_marginStart="16dp"
        android:textSize="16sp"
        app:layout_constraintBottom_toBottomOf="@+id/dogAgeTv"
        app:layout_constraintStart_toEndOf="@+id/dogAgeTv"
        app:layout_constraintTop_toTopOf="@+id/dogAgeTv"
        tools:text="Gender" />

</android.support.constraint.ConstraintLayout>
5. 어댑터 생성
사실상 제일 헷갈리는 부분. RecyclerView와 그곳에 들어갈 각각의 item, 연동할 데이터까지 설정했으면 Adapter를 만들어야 한다. 사진, 종류, 나이, 성별 등 어느 요소를 어느 View에 넣을 것인지 연결해주는 것이 Adpater의 역할이다. 변수도 많아서 처음 배울 때 엄청 헷갈렸는데, 이 변수가 String인지 TextView인지, 어디에 사용하는 건지 차근차근 따져보면서 공부했던 기억이 난다.
차근차근 프로젝트에 MainRvAdapter.kt 파일부터 만든다. 변수로는 우선 Context와 ArrayList<Class>를 필요로 한다.
class MainRvAdapter(val context: Context, val dogList, ArrayList<Dog>) :
RecyclerView.Adapter<>() {

    }
리사이클러뷰의 어댑터는 기본 BaseAdapter()가 아닌, RecyclerView.Adapter 를 extend 해야 한다. 그런데 이 RecyclerView.Adapter 에서는 ViewHolder라는 것이 필요한데, 아직 만들어지지 않았으므로 RecyclerView.Adapter<> 괄호 부분에서 에러가 날 것이다. 여기에 필요한 Holder 클래스를 하단에 추가한다.
class MainRvAdapter(val context: Context, val dogList, ArrayList<Dog>):
RecyclerView.Adapter<>() {

    inner class Holder(itemView: View?) : RecyclerView.ViewHolder(itemView) {
        val dogPhoto = itemView?.findViewById<ImageView>(R.id.dogPhotoImg)
        val dogBreed = itemView?.findViewById<TextView>(R.id.dogBreedTv)
        val dogAge = itemView?.findViewById<TextView>(R.id.dogAgeTv)
        val dogGender = itemView?.findViewById<TextView>(R.id.dogGenderTv)

        fun bind (dog: Dog, context: Context) {
          /* dogPhoto의 setImageResource에 들어갈 이미지의 id를 파일명(String)으로 찾고,
          이미지가 없는 경우 안드로이드 기본 아이콘을 표시한다.*/
            if (dog.photo != "") {
                val resourceId = context.resources.getIdentifier(dog.photo, "drawable", context.packageName)
                dogPhoto?.setImageResource(resourceId)
            } else {
                dogPhoto?.setImageResource(R.mipmap.ic_launcher)
            }
            /* 나머지 TextView와 String 데이터를 연결한다. */
            dogBreed?.text = dog.breed
            dogAge?.text = dog.age
            dogGender?.text = dog.gender
        }
    }
}
Holder의 상단에서는 각 View의 이름을 정하고, findViewById를 통해 ImageView인지 TextView인지 Button인지 등 종류를 정하고 id를 통해 layout과 연결된다. bind 함수는 ViewHolder와 클래스의 각 변수를 연동하는 역할을 한다. 이후에 Override 할 함수에서 사용할 것이다. 쉽게 말해 이쪽 TextView엔 이 String을 넣어라, 라고 지정하는 함수이다.
그리고 상단 RecyclerView.Adapter<>의 괄호에 지금 만든 Holder를 넣는다. inner Class로 만들었기 때문에 MainRvAdapter.Holder를 입력한다.
이제 본격적으로 Adapter에 필요한 함수를 설정해야 한다. MainRvAdapter라는 클래스 이름에 빨간 줄이 그어지며 오류가 나는데, 필수로 사용해야 하는 함수를 Override하지 않았기 때문이다. Alt + Enter를 눌러 목록에 있는 세 개의 함수를 모두 Override 한다.
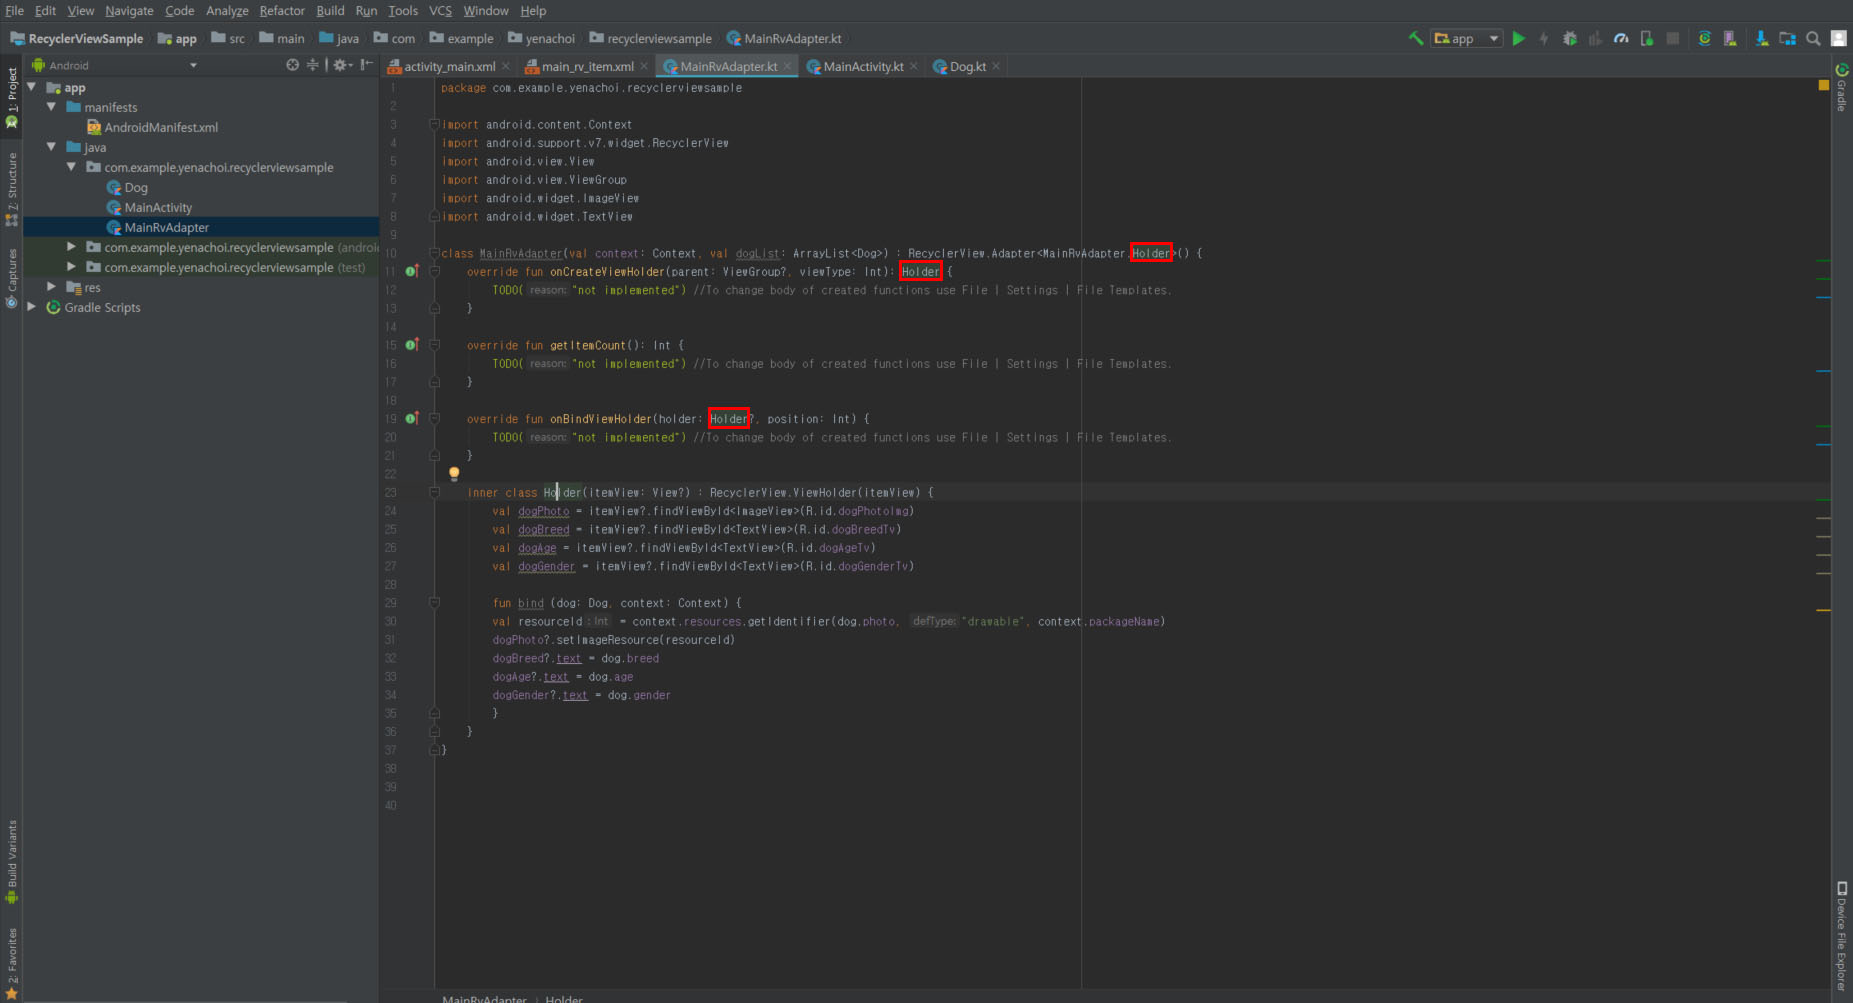
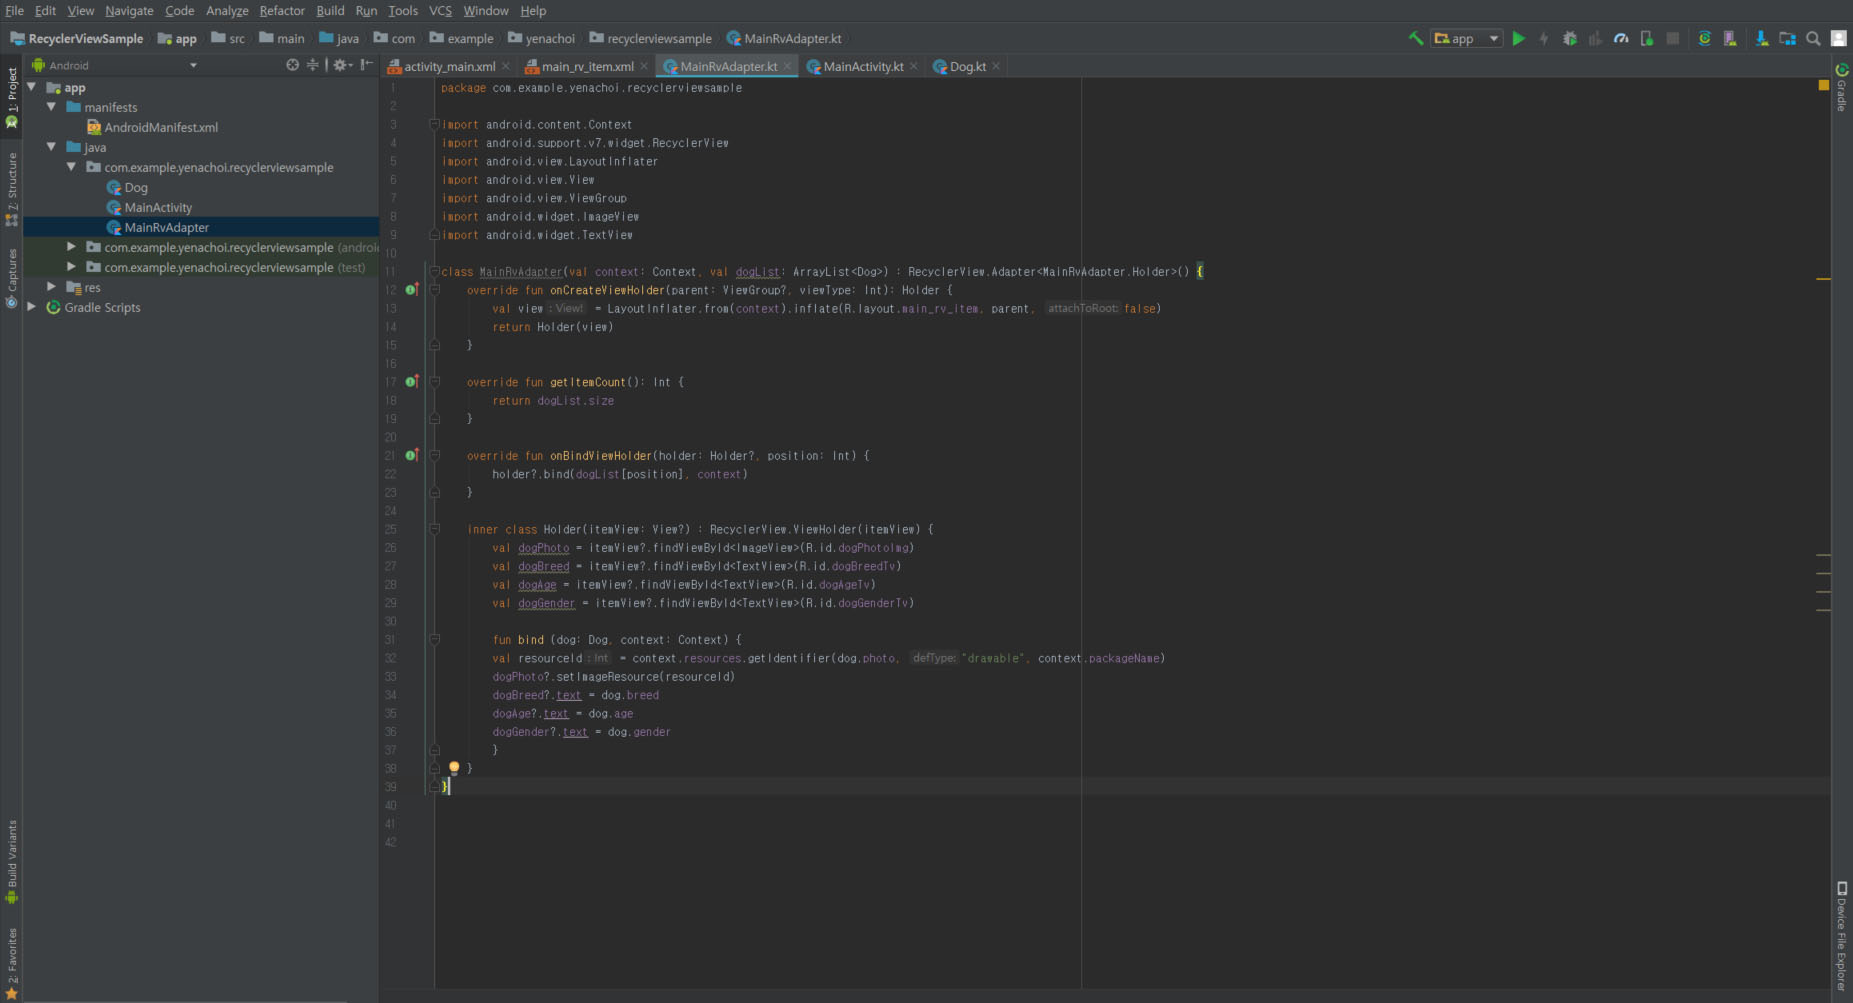
위 이미지에 표시한 것처럼, ViewHolder가 들어가야 하는 자리에는 뷰 홀더를 입력해준다. 각 함수의 내용을 채워 넣어야 하는데, 간단히 기능을 설명하자면 다음과 같다.
onCreateViewHolder: 화면을 최초 로딩하여 만들어진 View가 없는 경우, xml파일을 inflate하여 ViewHolder를 생성한다.getItemCount: RecyclerView로 만들어지는 item의 총 개수를 반환한다.onBindViewHolder: 위의 onCreateViewHolder에서 만든 view와 실제 입력되는 각각의 데이터를 연결한다.
override fun onCreateViewHolder(parent: ViewGroup?, viewType: Int): Holder {
    val view = LayoutInflater.from(context).inflate(R.layout.main_rv_item, parent, false)
    return Holder(view)
}

override fun getItemCount(): Int {
    return dogList.size
}

override fun onBindViewHolder(holder: Holder?, position: Int) {
    holder?.bind(dogList[position], context)
}
모든 함수를 오버라이드 하고, 뷰 홀더까지 만든 최종 코드는 아래와 같다.
class MainRvAdapter(val context: Context, val dogList: ArrayList<Dog>) :
RecyclerView.Adapter<MainRvAdapter.Holder>() {
    override fun onCreateViewHolder(parent: ViewGroup?, viewType: Int): Holder {
        val view = LayoutInflater.from(context).inflate(R.layout.main_rv_item, parent, false)
        return Holder(view)
    }

    override fun getItemCount(): Int {
        return dogList.size
    }

    override fun onBindViewHolder(holder: Holder?, position: Int) {
        holder?.bind(dogList[position], context)
    }

    inner class Holder(itemView: View?) : RecyclerView.ViewHolder(itemView) {
        val dogPhoto = itemView?.findViewById<ImageView>(R.id.dogPhotoImg)
        val dogBreed = itemView?.findViewById<TextView>(R.id.dogBreedTv)
        val dogAge = itemView?.findViewById<TextView>(R.id.dogAgeTv)
        val dogGender = itemView?.findViewById<TextView>(R.id.dogGenderTv)

        fun bind (dog: Dog, context: Context) {
            if (dog.photo != "") {
                val resourceId = context.resources.getIdentifier(dog.photo, "drawable", context.packageName)
                dogPhoto?.setImageResource(resourceId)
            } else {
                dogPhoto?.setImageResource(R.mipmap.ic_launcher)
            }
            dogBreed?.text = dog.breed
            dogAge?.text = dog.age
            dogGender?.text = dog.gender
        }
    }
}
6. 어댑터 설정
Adapter를 만들었으면 메인 액티비티로 돌아가서 Adapter를 생성하고, 어떤 데이터(ArrayList)와 어떤 RecyclerView를 쓸 것인지 설정한다.
/* MainActivity.kt */

class MainActivity : AppCompatActivity() {

    var dogList = arrayListOf<Dog>()

    override fun onCreate(savedInstanceState: Bundle?) {
        super.onCreate(savedInstanceState)
        setContentView(R.layout.activity_main)

        val mAdapter = MainRvAdapter(this, dogList)
        mRecyclerView.adapter = mAdapter
    }
}
추가로, ListView Adapter와는 다르게, RecyclerView Adapter에서는 레이아웃 매니저 (LayoutManager) 를 설정해주어야 한다.
LayoutManager는 RecyclerView의 각 item들을 배치하고, item이 더이상 보이지 않을 때 재사용할 것인지 결정하는 역할을 한다. item을 재사용할 떄, LayoutManager는 Adapter에게 view의 요소를 다른 데이터로 대체할 것인지 물어본다. LayoutManager 사용을 통해 불필요한 findViewById를 수행하지 않아도 되고, 앱 성능을 향상시킬 수 있다.
기본적으로 안드로이드에서 3가지의 LayoutManager 라이브러리를 지원한다.
- LinearLayoutManager
- GridLayoutManager
- StaggeredGridLayoutManager
이 외에도 사용자가 추상 클래스를 확장하여 임의의 레이아웃을 지정할 수도 있다. 이 예제에서는 LinearLayoutManager를 사용했다. RecyclerView를 불러올 액티비티에 LayoutManager를 추가한다.
마지막으로 recyclerView에 setHasFixedSize 옵션에 true 값을 준다. 그 이유는 item이 추가되거나 삭제될 때 RecyclerView의 크기가 변경될 수도 있고, 그렇게 되면 계층 구조의 다른 View 크기가 변경될 가능성이 있기 때문이다. 특히 item이 자주 추가/삭제되면 오류가 날 수도 있기에 setHasFixedSize true를 설정한다.
class MainActivity : AppCompatActivity() {

    var dogList = arrayListOf<Dog>()

    override fun onCreate(savedInstanceState: Bundle?) {
        super.onCreate(savedInstanceState)
        setContentView(R.layout.activity_main)

        val mAdapter = MainRvAdapter(this, dogList)
        mRecyclerView.adapter = mAdapter

        val lm = LinearLayoutManager(this)
        mRecyclerView.layoutManager = lm
        mRecyclerView.setHasFixedSize(true)
    }
}
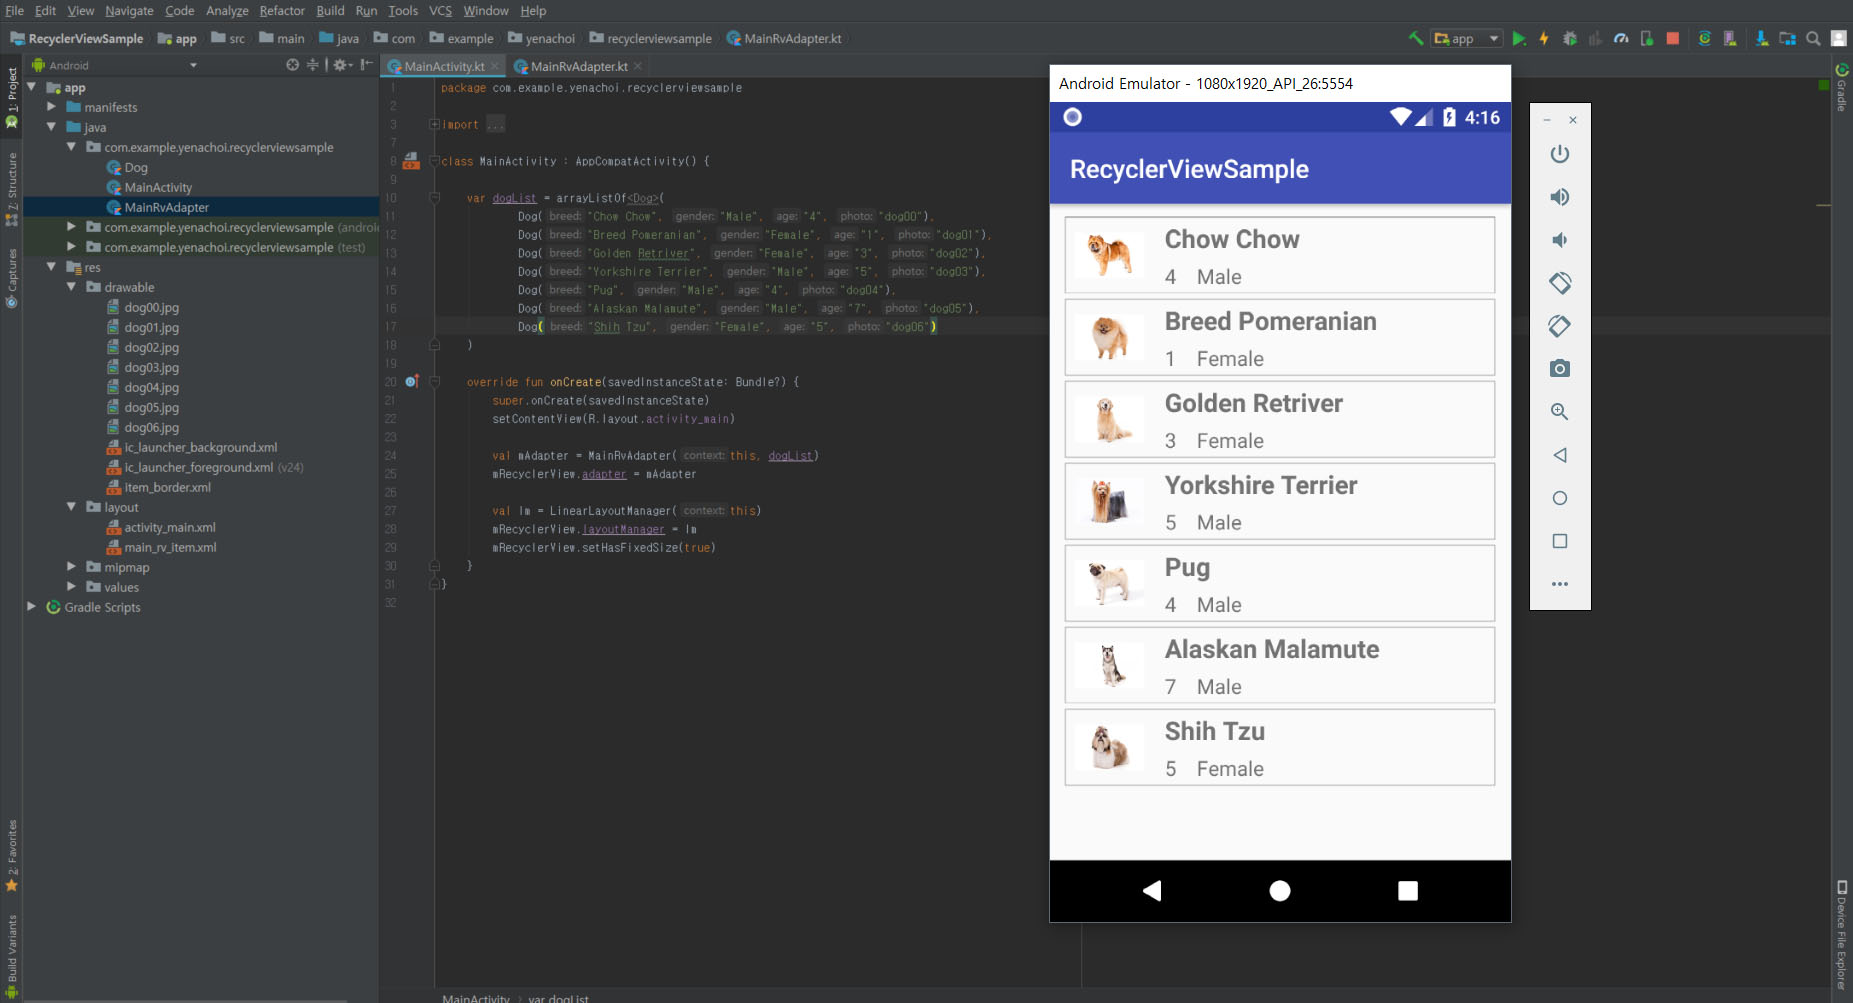
하지만 이 상태로 실행한다면 화면에 아무 것도 나타나지 않을 것이다. ArrayList가 비어있기 때문이다. 이후에 데이터 추가 기능을 만들게 되겠지만, 우선은 임의의 데이터를 하드코딩해서 리스트가 제대로 뜨는지 확인하기 위해 dogList에 데이터를 추가하고, drawable에 dog00.jpg, dog01.jpg 등의 리소스를 추가했다.
var dogList = arrayListOf<Dog>(
    Dog("Chow Chow", "Male", "4", "dog00"),
    Dog("Breed Pomeranian", "Female", "1", "dog01"),
    Dog("Golden Retriver", "Female", "3", "dog02"),
    Dog("Yorkshire Terrier", "Male", "5", "dog03"),
    Dog("Pug", "Male", "4", "dog04"),
    Dog("Alaskan Malamute", "Male", "7", "dog05"),
    Dog("Shih Tzu", "Female", "5", "dog06")
)
각 item 클릭 시의 이벤트 처리는 RecyclerView(2) 포스트에 정리했다.
References
- https://developer.android.com/guide/topics/ui/layout/recyclerview.html#structure
- https://stackoverflow.com/questions/28709220/understanding-recyclerview-sethasfixedsize
- https://www.akc.org/