[Android] ConstraintLayout 레이아웃
by Yena Choi
언제부턴가 Android Studio에서 ConstraintLayout 를 강력하게 밀고 있는 듯하다. New project를 만들면 기본적으로 생성되는 “Hello World!” 텍스트가 있는 액티비티도 ConstraintLayout으로 생성된다.
ConstraintLayout란
ConstraintLayout(컨스트레인트 레이아웃)은 위치와 크기 조절을 유연하게 할 수 있는 ViewGroup이다. 다양한 해상도를 지원하는 앱 작업을 할 때 상당히 편리하다.
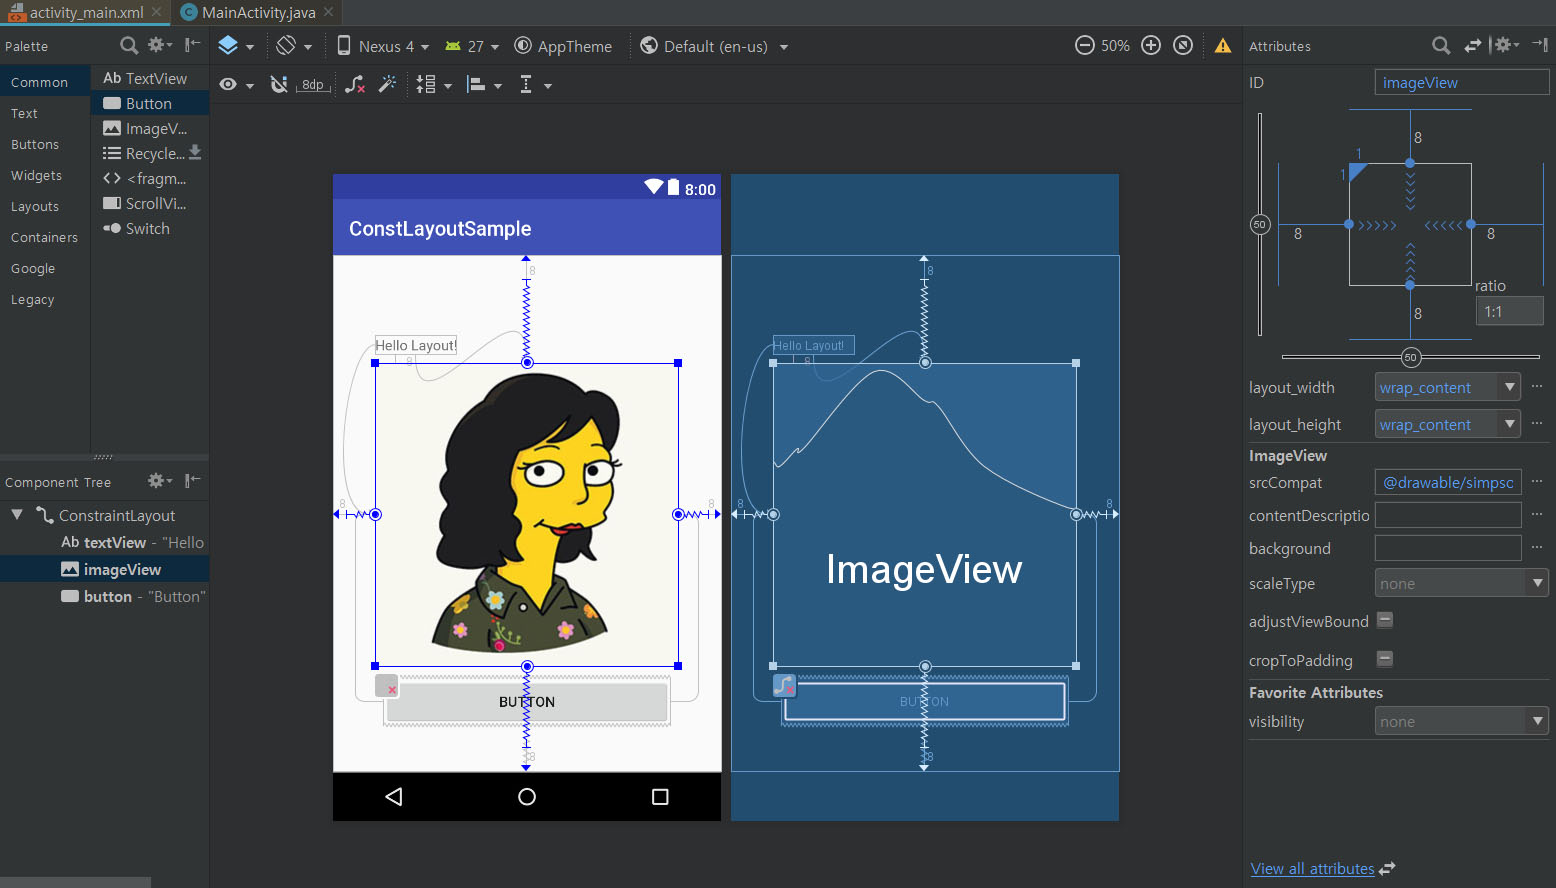
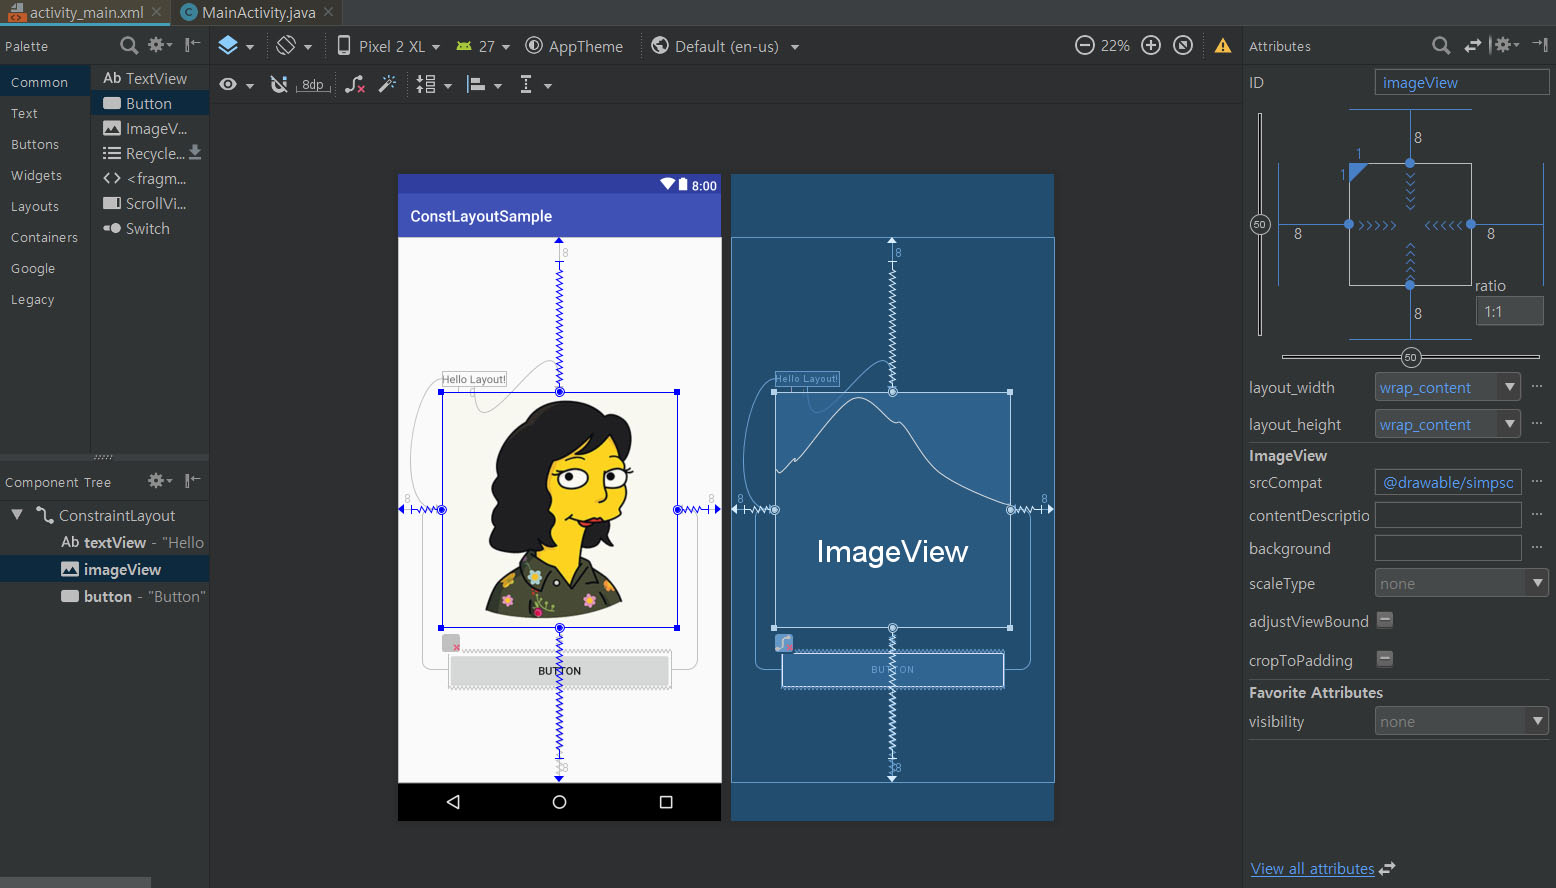
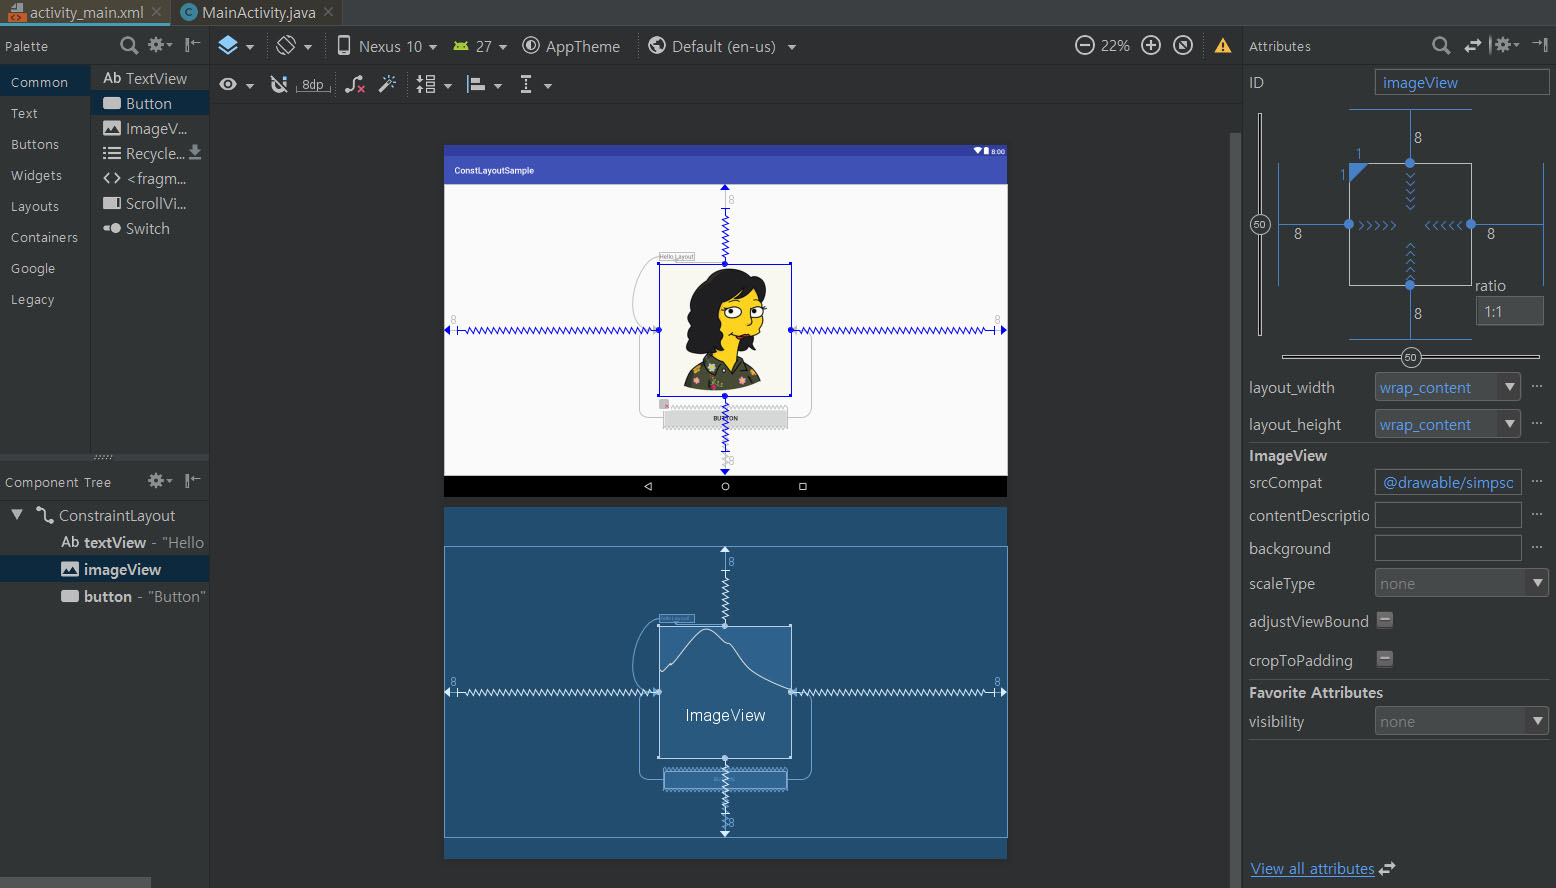
아래 예제는 같은 코드로 작성한 xml 파일을 다른 기기(해상도)에서 실행한 것이다. 1) TextView, 2) ImageView, 3) Button의 세 가지 뷰로 구성되어 있다. 각 View마다 크기 및 위치 조건은 다음과 같이 주었다.
- 이미지 : 원본 크기 맞춤, Parent의 수직 및 수평 중앙.
- 텍스트 : 텍스트 크기 맞춤, 이미지의 왼쪽에 맞춰 정렬, 이미지의 8dp 위에 위치.
- 버튼 : 이미지의 좌우 크기에 맞춰 크기 확장, 이미지ㅡParent의 20% 되는 높이에 위치

▲ Nexus 4 (768 x 1280)

▲ Pixel 2 XL (1440 x 2880)

▲ Nexus 10 (2560 x 1600)
뷰와 뷰 간의 관계가 절대적인 수치 값이 아닌 상대적인 비율로 지정되어 있기 때문에, 위처럼 다양한 해상도에서 원하는 레이아웃 모양대로 정렬하여 나타낼 수 있다.
ConstraintLayout의 주요 속성
이제 하나씩 살펴보자. app-res-layout-activity_main.xml 에서 xml 파일로 된 레이아웃 코드를 볼 수 있다. Design 탭에서 직접 뷰를 보면서 조정해도 된다. Design탭과 xml 탭에서 내용을 변경할 시 다른 한 쪽에서도 자동으로 변경된다.
<!-- activity_main.xml -->

<android.support.constraint.ConstraintLayout
    xmlns:android="http://schemas.android.com/apk/res/android"
    xmlns:tools="http://schemas.android.com/tools"
    xmlns:app="http://schemas.android.com/apk/res-auto"
    android:layout_width="match_parent"
    android:layout_height="match_parent"
    tools:context=".MainActivity">

    <TextView
        android:id="@+id/textView"
        android:layout_width="wrap_content"
        android:layout_height="wrap_content"
        android:layout_marginBottom="8dp"
        android:text="Hello Layout!"
        app:layout_constraintBottom_toTopOf="@+id/imageView"
        app:layout_constraintStart_toStartOf="@+id/imageView" />

    <ImageView
        android:id="@+id/imageView"
        android:layout_width="wrap_content"
        android:layout_height="wrap_content"
        android:layout_marginBottom="8dp"
        android:layout_marginEnd="8dp"
        android:layout_marginStart="8dp"
        android:layout_marginTop="8dp"
        app:layout_constraintBottom_toBottomOf="parent"
        app:layout_constraintDimensionRatio="1:1"
        app:layout_constraintEnd_toEndOf="parent"
        app:layout_constraintStart_toStartOf="parent"
        app:layout_constraintTop_toTopOf="parent"
        app:srcCompat="@drawable/simpsonize_nachoi" />

    <Button
        android:id="@+id/button"
        android:layout_width="0dp"
        android:layout_height="wrap_content"
        android:layout_marginEnd="8dp"
        android:layout_marginStart="8dp"
        android:text="Button"
        app:layout_constraintBottom_toBottomOf="parent"
        app:layout_constraintEnd_toEndOf="@+id/imageView"
        app:layout_constraintStart_toStartOf="@+id/imageView"
        app:layout_constraintTop_toBottomOf="@+id/imageView"
        app:layout_constraintVertical_bias="0.2" />

</android.support.constraint.ConstraintLayout>
특징(1) - width 와 height
각 뷰는 필수적으로 가로와 세로 높이를 나타내는 속성을 가지고 있어야 한다.
android:layout_width: 뷰의 가로 길이를 나타냄. (폭, 너비)android:layout_height: 뷰의 세로 길이를 나타냄. (높이)
그리고 이 가로, 세로 속성은 3종류의 값을 가질 수 있다.
none: 화면의 비율에 상관 없이 고정 값을 갖는다.dp단위로 표기한다.wrap_content: 뷰가 차지하는 크기 만큼의 길이. Image의 경우, 특별히 dp값을 지정하지 않으면 원본 크기가 되며, TextView의 경우는 글자를 감싸는 크기가 된다.match_constraint: 실제로 xml 파일에서는"0dp"로 표기한다. 뷰의 가로 혹은 세로를 다른 곳에 고정시킨 후, 해당하는 영역을 모두 차지한다.
예제의 TextView나 ImageView의 width와 height 값 모두 wrap_content이다.
android:layout_width="wrap_content"
android:layout_height="wrap_content"
반면 Button의 width값은 match_constraint 이다. 0dp로 표시되며, 왼쪽과 오른쪽이 연결된 곳에 길이가 자동으로 맞춰진다. 만약 왼쪽과 오른쪽을 TextView에 연결했으면 TextView가 차지하는 영역 만큼이 버튼 크기가 되고, 레이아웃(Parent)에 연결했으면 화면을 꽉 채우는 크기가 된다.
android:layout_width="0dp"
android:layout_height="wrap_content"
특징(2) - constraint(A)_to(B)Of
xml 파일을 살펴보면 공통적으로 여러 개의 constraint(A)_to(B)Of 옵션을 가지고 있다. 말 그대로 상/하/좌/우를 다른 뷰의 어느 곳에 연결할 것인지 정해주는 옵션이다. constraint 를 정해주지 않으면 경고 표시가 발생하며, View를 다른 곳에 연결하지 않은 채 앱을 실행하면 View가 좌측 상단으로 이동해버린다. 그렇기 때문에 반드시 다른 View 혹은 Parent에 연결해야 한다.
ImageView는 상/하/좌/우가 각각 parent에 연결되어 있다.
app:layout_constraintBottom_toBottomOf="parent"
app:layout_constraintEnd_toEndOf="parent"
app:layout_constraintStart_toStartOf="parent"
app:layout_constraintTop_toTopOf="parent"
길이 값이 wrap_content이면서 4방향 모두 parent에 연결되어 있을 때 View는 예제와 같이 화면 중앙에 위치하게 된다. (만약 길이 값이 match_constraint인 경우에는 parent의 크기에 맞춰 이미지가 크기가 늘어난다.)
다음으로, TextView는 좌측이 ImageView의 좌측에, 하단이 ImageView의 상단에 각각 연결되어 있다.
app:layout_constraintBottom_toTopOf="@+id/imageView"
app:layout_constraintStart_toStartOf="@+id/imageView"
View의 id값을 통해 View를 찾고, 이를 기준으로 constraint 옵션이 생긴다. 하단에는 layout_marginBottom 값이 있기 때문에 8dp의 여백이 생긴다. 이 값이 없다면 TextView는 ImageView 바로 위에 위치하게 된다.
android:layout_marginBottom="8dp"
Button 에 적용된 constraint는 다음과 같다.
app:layout_constraintBottom_toBottomOf="parent"
app:layout_constraintEnd_toEndOf="@+id/imageView"
app:layout_constraintStart_toStartOf="@+id/imageView"
app:layout_constraintTop_toBottomOf="@+id/imageView"
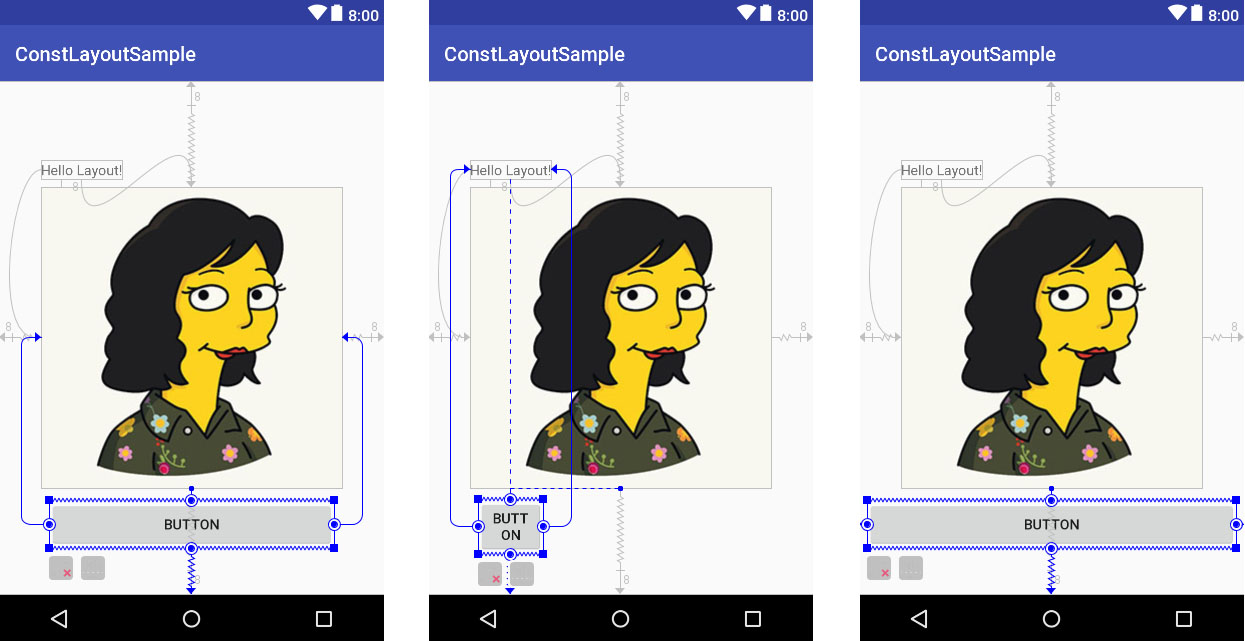
좌우는 ImageView에, 상하는 각각 ImageView와 parent에 연결되었다. width가 0dp이기 때문에 ImageView의 width 길이와 같아진다. 만약 다른 곳에 연결한다면 Button의 크기도 달라지게 된다.

Button의 Start와 End를 ImageView, TextView, parent 의 좌우에 연결했을 때 match_constraint, 즉 android:layout_width="0dp" 값을 가질 때 각각 연결된 View에 따라 크기가 바뀐다. 추가로 marginStart, marginEnd 값인 8dp만큼 좌우에 여백이 생긴다.
Button의 Top과 Bottom은 ImageView와 parent에 각각 연결되었기 때문에 그 사이에 위치하게 된다. 여기서는 20% 비율의 높이에 위치하도록 설정되어 있다.
특징(3) - 비율에 따른 View 조절
-
정사각형 이미지
ImageView의 옵션 중 다음과 같은 옵션이 있다.
app:layout_constraintDimensionRatio="1:1"이미지가 정사각형이 아닐 때에 위 옵션을 적용해준다면 1:1 비율로 설정된다. 자세한 것은 Layout Tips 포스트를 참고할 수 있다.
-
Bias (비율 조정)
상하나 좌우를 연결했을 때, 이미지는 가운데에 위치하게 된다. 이때, bias 옵션을 주면 0~1 사이 옵션에서 중앙 (0.5)이 아닌 비율로 정렬이 가능하다. Button은 상하가 ImageView와 parent에 연결되어 있고, bias 값을 주지 않으면 기본적으로 중앙에 위치한다. 예제와 같이 bias 값을 조정하면 0~1 (0%~100%) 비율로 위치하게 된다.
app:layout_constraintVertical_bias="0.2"
이제 버튼은 이미지와 맨 밑 사이의 공간에서 20%에 해당하는 곳에 위치하게 된다. 여러 해상도에 같은 비율을 적용해야 할 때 유용한 옵션이다.
그 밖의 참고사항
-
dependency
이전에는
build.gradle(Module:app)에서 ConstraintLayout의 dependency를 추가해야 했는데, 요즘에는 자동으로 implementation에 추가되는 것 같다. 만약 프로젝트에 dependency가 없다면 아래와 같은 형태로 추가 해야 ConstraintLayout을 사용할 수 있다.dependencies { ... implementation 'com.android.support.constraint:constraint-layout:1.1.0' }
-
TextView 미리보기 전용 텍스트
android:text에 텍스트를 입력하면 앱을 실행했을 때에도 해당 텍스트가 보인다. 레이아웃 디자인 시에만 텍스트를 보이게 하려면tools:text로 텍스트를 입력할 수 있다. tools로 입력한 텍스트는 앱을 실행했을 때에는 보이지 않는다.android:text="실제 App에 표시되는 text들" tools:text="디자인을 위해서만 필요한 Fake text들" -
marginLeft 와 marginStart 차이
xml에서 marginLeft 값을 줄 수도 있고, marginStart 값을 줄 수도 있다. 그런데 Design 툴에서 마우스로 Constraint 연결 시에 marginStart로 표시되는 것을 볼 수 있다. 실제로 우리가 사용하는 대부분의 앱에서는 둘의 차이가 없다. 그 이유는 한글은 왼쪽 -> 오른쪽 방향으로 쓰기 때문에, 즉 왼쪽에서 시작하기 떄문이다. 하지만 오른쪽 -> 왼쪽으로 쓰는 언어의 경우 marginLeft를 사용하면 기대와는 다른 결과가 나올 것이다.
android:layout_marginLeft="10dp"
android:layout_marginStart="10dp"
다시 말하면 marginLeft는 절대적으로 왼쪽에서 시작하는 것이고, marginStart는 설정된 언어가 시작되는 방향에서 시작되는 것이다. 한글이나 영어를 사용할 경우 실질적으로 결과에는 차이가 없다. 나의 경우 marginStart 를 사용하고 있지만, 앱 특징에 따라 절대적으로 왼쪽에 여백을 주어야 할 경우 marginLeft를 사용하면 되겠다.
References
- https://developer.android.com/reference/android/support/constraint/ConstraintLayout.html
