[Android][Kotlin] Room 으로 DB 저장하기
by Yena Choi
로컬 DB를 저장할 일이 있어서 SQLite를 살펴보다가, 작년에 발표된 Room이라는 존재를 알게 되었다. 과연 정말 SQLite보다 간단하고 좋을까? 라는 의문으로 시작해서 이번 포스트를 작성하게 되었다. Room으로 데이터베이스를 저장하고, RecyclerView를 이용해 UI에 나타내주는 예제를 만들어 보았다.
Android Room?
Room을 말하기 전에, 이 Room이 포함된 안드로이드 아키텍쳐 (Android Architecture Components)라는 것이 있다. 안드로이드 아키텍쳐는 앱을 견고하고, 실험 가능하고, 유지보수성이 뛰어나도록 만들어주는 라이브러리 모음이다. 이 중의 하나가 Room
Room은 SQLite의 추상 레이어를 제공하여 SQLite의 객체를 매핑하는 역할을 한다. 쉽게 말하면 SQLite의 기능을 모두 사용할 수 있고, DB로의 접근을 편하게 도와주는 라이브러리 이다.
왜 SQLite를 직접 쓰지 않고 굳이 Room을 쓰는지에 대해선 Android Developers Page SQLite 문서에 ‘Caution’ 마크와 함께 다음과 같이 설명이 되어있다.
- There is no compile-time verification of raw SQL queries. As your data graph changes, you need to update the affected SQL queries manually. This process can be time consuming and error prone.
- (원본 SQL은 컴파일 시간이 확실하지 않다. SQL 데이터에 변화가 생기면 수동으로 업데이트 해 주어야 한다. 이 과정에서 시간이 많이 소요되며 오류가 생길 수 있다.)
- You need to use lots of boilerplate code to convert between SQL queries and data objects.
- (SQL 쿼리와 데이터 객체를 변환하기 위해서는 많은 상용구 코드(boilerplate code)를 작성해야 한다.)
즉 Room을 사용하면 컴파일 시간을 체크할 수 있으며, 무의미한 boilerplate 코드의 반복을 줄여줄 수 있다. 그리고 공식 문서에서 거듭 ‘easy’ 라고 하는데, 과연 어떨지…
Room이 Architecture Components에 포함되는 만큼, Architecture Components 다른 구성 요소인 LiveData나 ViewModel 등과 함께 사용하면 아주 간편하게 데이터베이스를 관리하고 UI를 갱신할 수 있다. 하지만 여기서는 기존 형식의 프로젝트에 SQLite 대신 Room으로 데이터를 저장하는 데에 의의를 두어 예제를 만들었다. LiveData나 ViewModel에 대해서는 더 공부해서 나중에 포스팅을 올릴 생각이다.
Room Components 룸 구성 요소
Room에는 3가지 구성 요소가 있다.
-
Entity- Database 안에 있는 테이블을 Java나 Kotlin 클래스로 나타낸 것이다. 데이터 모델 클래스라고 볼 수 있다. -
DAO- Database Access Object, 데이터베이스에 접근해서 실질적으로 insert, delete 등을 수행하는 메소드를 포함한다. -
Database- database holder를 포함하며, 앱에 영구 저장되는 데이터와 기본 연결을 위한 주 액세스 지점이다.RoomDatabase를 extend 하는 추상 클래스여야 하며, 테이블과 버전을 정의하는 곳이다.

Dependency 추가
먼저, Room을 쓰기 위해 build.gradle (Module: app) 파일에 Dependency를 추가한다.
Android Developers Page 를 참조하여 각자의 환경에 맞게 설정해준다. 먼저 Java 언어를 사용할 경우, 아래와 같이 추가한다. 버전은 현재 지원하고 있는 1.1.1을 적용했다.
/* when using Java */
dependencies {
    implementation "android.arch.persistence.room:runtime:1.1.1"
    annotationProcessor "android.arch.persistence.room:compiler:1.1.1"
    testImplementation "android.arch.persistence.room:testing:1.1.1"
}
만약 Java가 아닌 Kotlin을 쓰고 있다면, annotationProcessor 대신 kapt 를 이용한다. 코드 내에 Java 클래스가 포함되어 있어도 kapt가 그것까지 고려해 줄 것이다. test 소스는 kaptTest 소스로 대체한다. (이 내용은 Kotlin kapt 페이지를 참조하였다.)
/* when using Kotlin */
apply plugin: 'kotlin-kapt'

dependencies {
    implementation "android.arch.persistence.room:runtime:1.1.1"
    kapt "android.arch.persistence.room:compiler:1.1.1"
    kaptTest "android.arch.persistence.room:testing:1.1.1"
}
추가로, RxJava나 Guava를 사용한다면 dependencies에 아래 코드도 같이 적어준다.
/* optional - RxJava support for Room */
implementation "android.arch.persistence.room:rxjava2:1.1.1"

/* optional - Guava support for Room, including Optional and ListenableFuture */
implementation "android.arch.persistence.room:guava:1.1.1"
Room Components 작성하기
차근차근 코드를 작성해보자. 고양이의 수명과 국가 목록을 저장하는 데이터베이스를 만들어보았다. 왜 뜬금없이 고양이 수명이냐 하면 별 이유는 없다. 듣고 있던 노래가 홍재목의 ‘네가 고양이면 좋겠다’ 였고, 그래서 고양이의 종류를 구글링 해보니 breedslist.com라는 도움되는 사이트가 나왔기 때문이다.
Entity
앞서 Dependency에 무사히 Room을 추가했으면 Entity를 import 해서 Entity로 선언된 클래스를 만들 수 있다. 데이터 모델인 ‘고양이’에 무엇이 들어갈지 정의해준다.
/* Cat.kt */

@Entity(tableName = "cat")
class Cat(@PrimaryKey var id: Long?,
          @ColumnInfo(name = "catname") var catName: String?,
          @ColumnInfo(name = "lifespan") var lifeSpan: Int,
          @ColumnInfo(name = "origin") var origin: String
){
    constructor(): this(null,"", 0,"")
}
각각의 Entity는 고유 식별자인 PrimaryKey(기본키)가 반드시 필요하다. 큰 의미가 없다면, autoGenerate 를 이용해 자동으로 생성되게 하는 것도 가능하다.
/* Cat.kt */

@Entity
class Cat(@PrimaryKey(autoGenerate = true) var id: Long?,
          @ColumnInfo ...
)
참고 - https://developer.android.com/training/data-storage/room/defining-data
DAO
다음으로 DB에 접근해 질의를 수행할 DAO 파일을 만든다. Query를 메소드로 작성해주어야 한다.
/* CatDao.kt */

@Dao
interface CatDao {
    @Query("SELECT * FROM cat")
    fun getAll(): List<Cat>

    /* import android.arch.persistence.room.OnConflictStrategy.REPLACE */
    @Insert(onConflict = REPLACE)
    fun insert(cat: Cat)

    @Query("DELETE from cat")
    fun deleteAll()
}
참고 - https://developer.android.com/training/data-storage/room/accessing-data
Database
Entity 모델을 기반으로 하고, DAO의 메소드를 가지고 있는 데이터베이스를 생성하자. 위에서 언급했듯이 RoomDatabase()를 상속한다.
MainActivity에서 호출하여 database 객체를 반환하거나 삭제할 수 있도록 getInstance()와 destroyInstance() 메소드를 생성해준다.
/* CatDB.kt */

@Database(entities = [Cat::class], version = 1)
abstract class CatDB: RoomDatabase() {
    abstract fun catDao(): CatDao

    companion object {
        private var INSTANCE: CatDB? = null

        fun getInstance(context: Context): CatDB? {
            if (INSTANCE == null) {
                synchronized(CatDB::class) {
                    INSTANCE = Room.databaseBuilder(context.applicationContext,
                            CatDB::class.java, "cat.db")
                            .fallbackToDestructiveMigration()
                            .build()
                }
            }
            return INSTANCE
        }

        fun destroyInstance() {
            INSTANCE = null
        }
    }
}
Activity에서 Room에 접근하기
Room 구축이 끝났으면 MainActivity에서 객체를 생성해보자. 한 가지 조심해야 할 것은, 메인 쓰레드에서 Room DB에 접근하려고 하면 에러가 발생한다. 아래의 IllegalStateException 메세지를 볼 수 있다.
- Cannot access database on the main thread since it may potentially lock the UI for a long period of time.
- 메인 UI 화면이 오랫동안 멈춰있을 수도 있기 때문에, 메인 쓰레드에서는 데이터베이스에 접근할 수 없습니다.
따라서 Room과 관련된 액션은 Thread, AsyncTask 등을 이용해 백그라운드에서 작업해야 한다.
큰 그림은 아래와 같다. CatDataBase 의 Room.databaseBuilder를 호출해 새로운 db 객체를 만들고, 데이터 읽기/쓰기는 서브 쓰레드에서 작업하게 될 것이다.
/* MainActivity.kt */

class MainActivity : AppCompatActivity() {
    private var catDb : CatDB? = null

    override fun onCreate(savedInstanceState: Bundle?) {
        super.onCreate(savedInstanceState)
        setContentView(R.layout.activity_main)

        catDb = CatDB.getInstance(this)

        val r = Runnable {
            // 데이터에 읽고 쓸때는 쓰레드 사용
        }

        val thread = Thread(r)
        thread.start()
    }
}
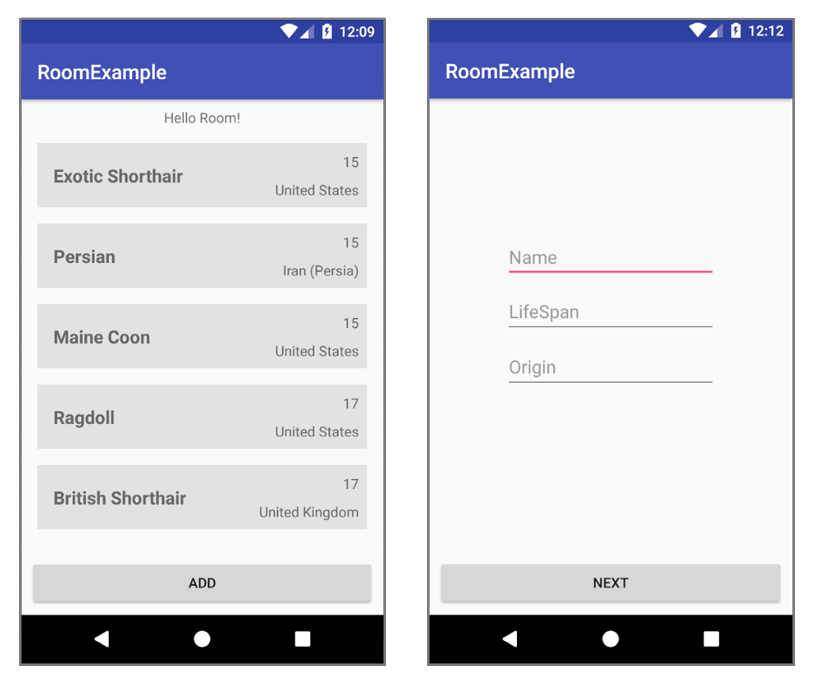
메인 액티비티에서 DB 객체까지 만들었다. 이제 RecyclerView와 Adapter를 설정해여 각 View마다 Room의 데이터를 뿌려 주자.
RecyclerView & Adapter
리사이클러 뷰를 쓰기 전에 gradle에 recyclerView 라이브러리를 추가하는 것도 잊지 말자. 우선 activity_main.xml 레이아웃에 RecyclerView를 추가하고, 리싸이클러 뷰에 들어갈 아이템 레이아웃도 만들어준다. RecyclerView에 대한 포스팅은
RecyclerView(1),
RecyclerView(2) 에 정리해두었다.
<!-- main_activity.xml -->

<?xml version="1.0" encoding="utf-8"?>
<android.support.constraint.ConstraintLayout
    xmlns:android="http://schemas.android.com/apk/res/android"
    xmlns:app="http://schemas.android.com/apk/res-auto"
    xmlns:tools="http://schemas.android.com/tools"
    android:layout_width="match_parent"
    android:layout_height="match_parent"
    tools:context=".MainActivity">

    <TextView
        android:id="@+id/mTextView"
        android:layout_width="wrap_content"
        android:layout_height="wrap_content"
        android:layout_marginTop="8dp"
        android:text="Hello Room!"
        app:layout_constraintLeft_toLeftOf="parent"
        app:layout_constraintRight_toRightOf="parent"
        app:layout_constraintTop_toTopOf="parent" />

    <android.support.v7.widget.RecyclerView
        android:id="@+id/mRecyclerView"
        android:layout_width="0dp"
        android:layout_height="0dp"
        android:layout_marginBottom="16dp"
        android:layout_marginEnd="8dp"
        android:layout_marginStart="8dp"
        android:layout_marginTop="8dp"
        app:layout_constraintBottom_toTopOf="@+id/mAddBtn"
        app:layout_constraintEnd_toEndOf="parent"
        app:layout_constraintHorizontal_bias="0.5"
        app:layout_constraintStart_toStartOf="parent"
        app:layout_constraintTop_toBottomOf="@+id/mTextView" />

    <Button
        android:id="@+id/mAddBtn"
        android:layout_width="0dp"
        android:layout_height="wrap_content"
        android:layout_marginBottom="8dp"
        android:layout_marginEnd="8dp"
        android:layout_marginStart="8dp"
        android:text="Add"
        app:layout_constraintBottom_toBottomOf="parent"
        app:layout_constraintEnd_toEndOf="parent"
        app:layout_constraintStart_toStartOf="parent" />

</android.support.constraint.ConstraintLayout>
item_cat 이라는 이름의 RecyclerView Item을 만들었다.
<!-- item_cat.xml -->

<?xml version="1.0" encoding="utf-8"?>
<android.support.constraint.ConstraintLayout
    xmlns:android="http://schemas.android.com/apk/res/android"
    xmlns:app="http://schemas.android.com/apk/res-auto"
    xmlns:tools="http://schemas.android.com/tools"
    android:layout_width="match_parent"
    android:layout_height="80dp">

    <ImageView
        android:id="@+id/itemBack"
        android:layout_width="0dp"
        android:layout_height="0dp"
        android:layout_marginBottom="8dp"
        android:layout_marginEnd="8dp"
        android:layout_marginStart="8dp"
        android:layout_marginTop="8dp"
        android:background="#e2e2e2"
        app:layout_constraintBottom_toBottomOf="parent"
        app:layout_constraintEnd_toEndOf="parent"
        app:layout_constraintStart_toStartOf="parent"
        app:layout_constraintTop_toTopOf="parent" />

    <TextView
        android:id="@+id/itemName"
        android:layout_width="wrap_content"
        android:layout_height="wrap_content"
        android:layout_marginStart="16dp"
        android:textSize="18sp"
        android:textStyle="bold"
        app:layout_constraintBottom_toBottomOf="@+id/itemBack"
        app:layout_constraintStart_toStartOf="@+id/itemBack"
        app:layout_constraintTop_toTopOf="@+id/itemBack"
        tools:text="Name" />

    <TextView
        android:id="@+id/itemLifeSpan"
        android:layout_width="wrap_content"
        android:layout_height="wrap_content"
        android:layout_marginBottom="8dp"
        android:layout_marginEnd="8dp"
        android:layout_marginTop="8dp"
        app:layout_constraintBottom_toTopOf="@+id/itemOrigin"
        app:layout_constraintEnd_toEndOf="@+id/itemBack"
        app:layout_constraintTop_toTopOf="@+id/itemBack"
        tools:text="LifeSpan" />

    <TextView
        android:id="@+id/itemOrigin"
        android:layout_width="wrap_content"
        android:layout_height="wrap_content"
        android:layout_marginBottom="8dp"
        android:layout_marginEnd="8dp"
        app:layout_constraintBottom_toBottomOf="@+id/itemBack"
        app:layout_constraintEnd_toEndOf="@+id/itemBack"
        tools:text="Origin" />

</android.support.constraint.ConstraintLayout>
View를 모두 만들었으면 Adatper를 통해 코드와 연결해준다.
/* CatAdapter.kt */

class CatAdapter(val context: Context, val cats: List<Cat>) :
 RecyclerView.Adapter<CatAdapter.Holder>() {

    override fun onCreateViewHolder(parent: ViewGroup?, viewType: Int): Holder {
        val view = LayoutInflater.from(context).inflate(R.layout.item_cat, parent, false)
        return Holder(view)
    }

    override fun getItemCount(): Int {
        return cats.size
    }

    override fun onBindViewHolder(holder: Holder?, position: Int) {
        holder?.bind(cats[position])
    }

    inner class Holder(itemView: View?) : RecyclerView.ViewHolder(itemView) {
        val nameTv = itemView?.findViewById<TextView>(R.id.itemName)
        val lifeTv = itemView?.findViewById<TextView>(R.id.itemLifeSpan)
        val originTv = itemView?.findViewById<TextView>(R.id.itemOrigin)

        fun bind(cat: Cat) {
            nameTv?.text = cat.catName
            lifeTv?.text = cat.lifeSpan.toString()
            originTv?.text = cat.origin
        }
    }
}
이제 최종적으로 MainActivity를 손보자. SQLite에서 바로 View로 데이터를 가져올 수 없으므로 Cat 클래스의 빈 리스트 List<Cat> 을 만들었다.
/* MainActivity.kt */

private var catList = listOf<Cat>()
빈 List로 초기화된 catList에 Room db에 저장된 정보를 모두 읽어와서 Cat 의 형태로 저장한다. 우리가 앞서 CatDao에서 만든 getAll() 메소드를 통해서 가져올 수 있다. 단, 서브 쓰레드를 사용하여 메인 쓰레드에 영향을 주지 않도록 해야 한다.
val r = Runnable {
    catList = catDb?.catDao()?.getAll()!!
}

val thread = Thread(r)
thread.start()
그리고 방금 만든 catList를 기반으로 CatAdapter의 객체 mAdapter를 만든다.
var mAdapter = CatAdapter(this, catList)
mAdapter.notifyDataSetChanged()
mRecyclerView.adapter = mAdapter
mRecyclerView.layoutManager = LinearLayoutManager(this)
mRecyclerView.setHasFixedSize(true)
MainActivity에서 Room db와 RecyclerView를 성공적으로 연결하더라도, 아직 추가한 데이터가 없으므로 RecyclerView에는 아무 정보도 표시되지 않는다. AddActivity를 만들어 데이터 추가가 가능하도록 해주자.
/* AddActivity.kt */

class AddActivity : AppCompatActivity() {

    private var catDb : CatDB? = null

    override fun onCreate(savedInstanceState: Bundle?) {
        super.onCreate(savedInstanceState)
        setContentView(R.layout.activity_add)

        catDb = CatDB.getInstance(this)

        /* 새로운 cat 객체를 생성, id 이외의 값을 지정 후 DB에 추가 */
        val addRunnable = Runnable {
            val newCat = Cat()
            newCat.catName = addName.text.toString()
            newCat.lifeSpan = addLifeSpan.text.toString().toInt()
            newCat.origin = addOrigin.text.toString()
            catDb?.catDao()?.insert(newCat)
        }

        addBtn.setOnClickListener {
            val addThread = Thread(addRunnable)
            addThread.start()

            val i = Intent(this, MainActivity::class.java)
            startActivity(i)
            finish()
        }
    }

    override fun onDestroy() {
        CatDB.destroyInstance()
        super.onDestroy()
    }
}
AddActivity 에서는 EditText에 입력한 정보를 기반으로, 새로운 Cat 객체를 만들어 DB에 추가한다.
AddActivity까지 최종적으로 연동한 MainActivity의 코드는 아래와 같다.
/* MainActivity.kt */

class MainActivity : AppCompatActivity() {

    private var catDb : CatDB? = null
    private var catList = listOf<Cat>()
    lateinit var mAdapter : CatAdapter

    override fun onCreate(savedInstanceState: Bundle?) {
        super.onCreate(savedInstanceState)
        setContentView(R.layout.activity_main)

        catDb = CatDB.getInstance(this)
        mAdapter = CatAdapter(this, catList)

        val r = Runnable {
            try {
                catList = catDb?.catDao()?.getAll()!!
                mAdapter = CatAdapter(this, catList)
                mAdapter.notifyDataSetChanged()

                mRecyclerView.adapter = mAdapter
                mRecyclerView.layoutManager = LinearLayoutManager(this)
                mRecyclerView.setHasFixedSize(true)
            } catch (e: Exception) {
                Log.d("tag", "Error - $e")
            }
        }

        val thread = Thread(r)
        thread.start()

        mAddBtn.setOnClickListener {
            val i = Intent(this, AddActivity::class.java)
            startActivity(i)
            finish()
        }
    }

    override fun onDestroy() {
        CatDB.destroyInstance()
        catDb = null
        super.onDestroy()
    }
}
이상으로 Room으로 데이터베이스를 저장하고 RecyclerView로 불러오는 예제를 만들어보았다. 우선 개인적으로는 boilerplate 코드를 덜 쓴다는 점에서 룸이 마음에 들었다. SQLite를 쓰기 위해 수많은 변수를 정의하는 일은 이제 너무나 번거롭게 느껴진다.
또한 이번 포스팅을 위해 Android Architecture를 공부한 결과, ViewModel과 LiveData를 쓰면 생명주기를 보다 간편하게 관리할 수 있고, Data가 갱신되면 자동으로 UI가 업데이트 되는 등 기존 프로젝트에 비해 코딩이 수월해 질 것으로 보였다. 이런 라이브러리들을 함께 쓰고 저장하게 고안된 것이 Room이기 때문에 앞으로 활용도가 높아질 것으로 예상이 된다.
Reference
- https://developer.android.com
- https://kotlinlang.org/docs/reference/kapt.html
- https://medium.com/mindorks/android-architecture-components-room-and-kotlin-f7b725c8d1d
- https://academy.realm.io/kr/posts/android-architecture-components-and-realm/
- https://www.youtube.com/watch?v=vOJCrbr144o
- https://virtuooza.com/add-data-to-sqlite-room-and-display-it-into-recyclerview/
- http://www.catbreedslist.com/all-cat-breeds/