[Android][Kotlin] Dialog 다이얼로그
by Yena Choi
Dialog는 사용자에게 결정을 내리거나 추가 정보를 입력하라는 prompt를 보내는 작은 창이다. Dialog 클래스가 기본이지만, 직접 인스턴스화해서 사용하지 않는다. 대신, AlertDialog, DatePickerDialog, TimePickerDialog 서브클래스를 사용한다.
DatePickerDialog와 TimePickerDialog는 날짜 또는 시간을 선택하기 편하도록 미리 UI가 지정되어 있는 서브클래스이다. AlertDialog로는 간단한 메세지를 담을 수 있으며, 직접 커스텀한 레이아웃을 사용하면 활용 범위가 넓어진다.
커스텀 Layout으로 AlertDialog 사용하기
직접 디자인한 Layout으로 AlertDialog를 구축하는 방법은 다음과 같다.
- Layout의 xml 파일을 만든다.
AlertDialog.Builder를 생성한다.- Dialog의 View 인스턴스를 생성해서 xml파일을 inflate한다.
- 확인/취소 등의 버튼을 설정한다.
1. Dialog custom layout
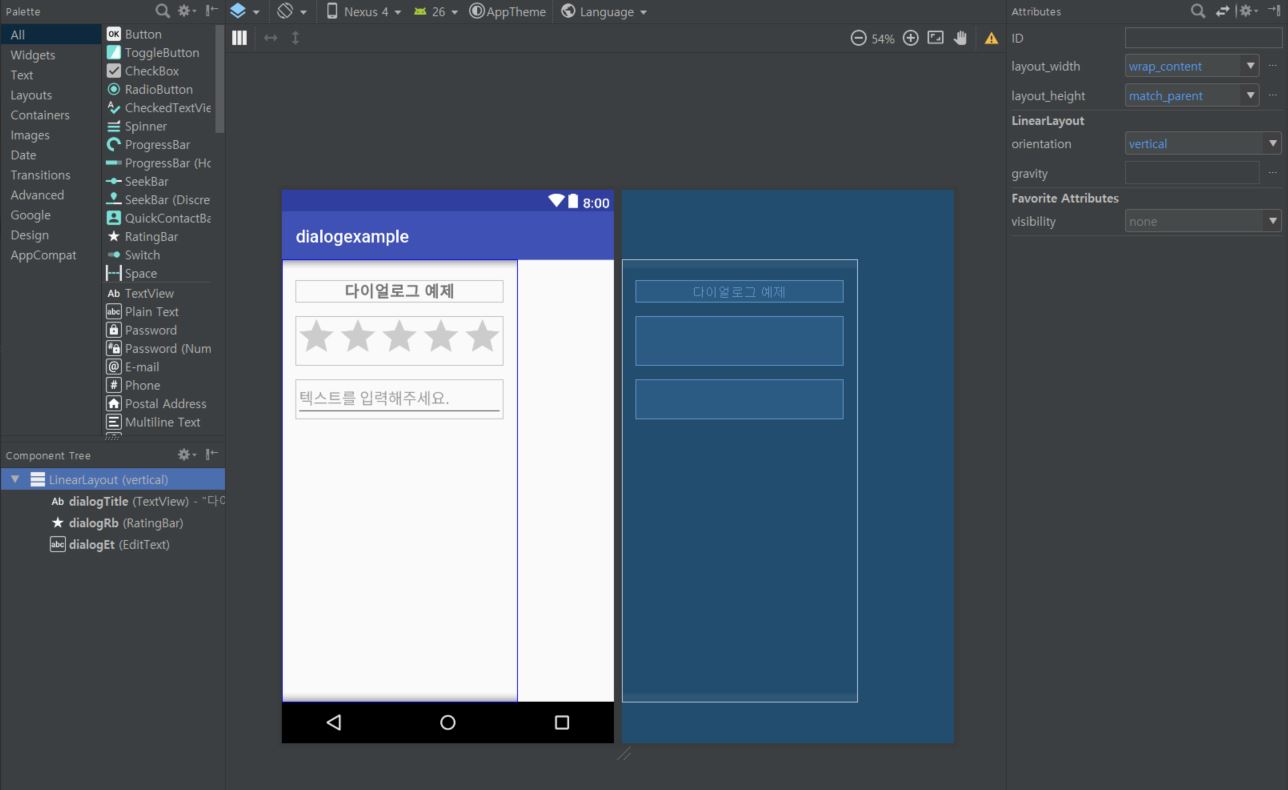
우선 새로운 layout 파일을 만들어서 dialog에 넣을 요소들을 추가한다. 여기서는 내용을 일렬로 나열하기 위해 LinearLayout을 사용했다.
<?xml version="1.0" encoding="utf-8"?>
<LinearLayout xmlns:android="http://schemas.android.com/apk/res/android"
    android:layout_width="wrap_content"
    android:layout_height="match_parent"
    android:orientation="vertical">

    <TextView
        android:id="@+id/dialogTitle"
        android:layout_width="match_parent"
        android:layout_height="wrap_content"
        android:layout_marginBottom="16dp"
        android:layout_marginLeft="16dp"
        android:layout_marginRight="16dp"
        android:layout_marginTop="24dp"
        android:text="다이얼로그 예제"
        android:textAlignment="center"
        android:textSize="18sp"
        android:textStyle="bold" />

    <RatingBar
        android:id="@+id/dialogRb"
        android:layout_width="wrap_content"
        android:layout_height="wrap_content"
        android:layout_gravity="center_horizontal"
        android:layout_marginBottom="16dp"
        android:layout_marginLeft="16dp"
        android:layout_marginRight="16dp"
        android:numStars="5" />

    <EditText
        android:id="@+id/dialogEt"
        android:layout_width="match_parent"
        android:layout_height="wrap_content"
        android:layout_marginLeft="16dp"
        android:layout_marginRight="16dp"
        android:ems="10"
        android:hint="텍스트를 입력해주세요."
        android:inputType="textPersonName" />
</LinearLayout>
2. AlertDialog.Builder 생성
AlertDialog.Builder(context) 인스턴스를 생성해준다.
val builder = AlertDialog.Builder(this)
3. Dialog의 View 인스턴스를 생성해서 xml 파일을 inflate
xml파일을 실제로 사용하기 위해 Dialog View 인스턴스를 만들고, 각각의 View 요소를 연결해준다.
val dialogView = layoutInflater.inflate(R.layout.custom_dialog, null)

val dialogText = dialogView.findViewById<EditText>(R.id.dialogEt)
val dialogRatingBar = dialogView.findViewById<RatingBar>(R.id.dialogRb)
4. 확인/취소 등의 버튼을 설정
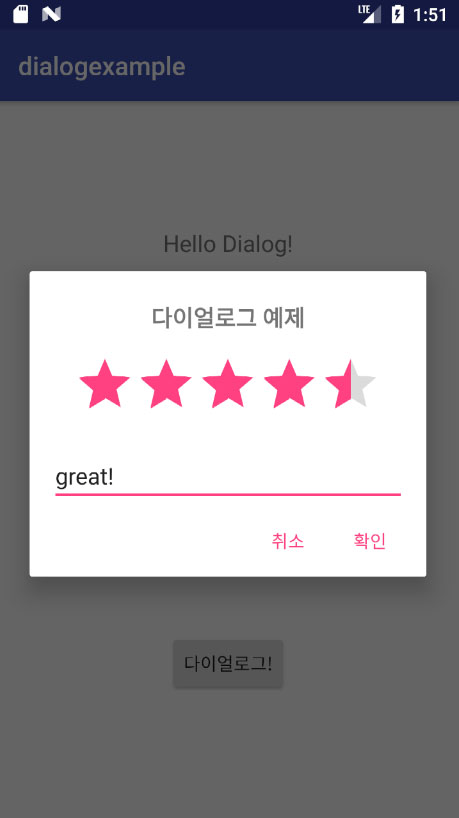
Builder를 통해 확인 버튼(PositiveButton)과 취소 버튼(NegativeButton)을 만들 수 있다. 꼭 확인/취소가 아니더라도, 액션에 따라 원하는 텍스트를 입력해주면 된다.
람다식을 이용해 setPositiveButton, setNegativeButton 액션을 설정할 수 있다.
Kotlin
builder.setView(dialogView)
          .setPositiveButton("확인") { dialogInterface, i ->
              mainTv.text = dialogText.text.toString()
              mainRb.rating = dialogRatingBar.rating
              /* 확인일 때 main의 View의 값에 dialog View에 있는 값을 적용 */

          }
          .setNegativeButton("취소") { dialogInterface, i ->
              /* 취소일 때 아무 액션이 없으므로 빈칸 */
          }
          .show()
builder의 마지막에 .show()를 붙이면 다이얼로그가 실행된다.
요약해서, 메인 액티비티에서 mainBtn 버튼을 눌렀을 때 다이얼로그가 실행되도록 하려면 아래와 같이 코드를 작성할 수 있다.
class MainActivity : AppCompatActivity() {

    override fun onCreate(savedInstanceState: Bundle?) {
        super.onCreate(savedInstanceState)
        setContentView(R.layout.activity_main)

        mainBtn.setOnClickListener {
            val builder = AlertDialog.Builder(this)
            val dialogView = layoutInflater.inflate(R.layout.custom_dialog, null)
            val dialogText = dialogView.findViewById<EditText>(R.id.dialogEt)
            val dialogRatingBar = dialogView.findViewById<RatingBar>(R.id.dialogRb)

            builder.setView(dialogView)
                      .setPositiveButton("확인") { dialogInterface, i ->
                          mainTv.text = dialogText.text.toString()
                          mainRb.rating = dialogRatingBar.rating
                          /* 확인일 때 main의 View의 값에 dialog View에 있는 값을 적용 */

                      }
                      .setNegativeButton("취소") { dialogInterface, i ->
                          /* 취소일 때 아무 액션이 없으므로 빈칸 */
                      }
                      .show()
        }
    }
}
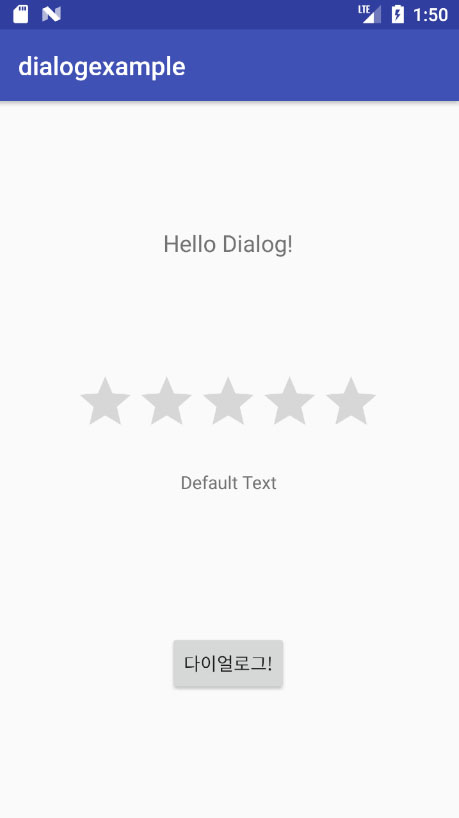
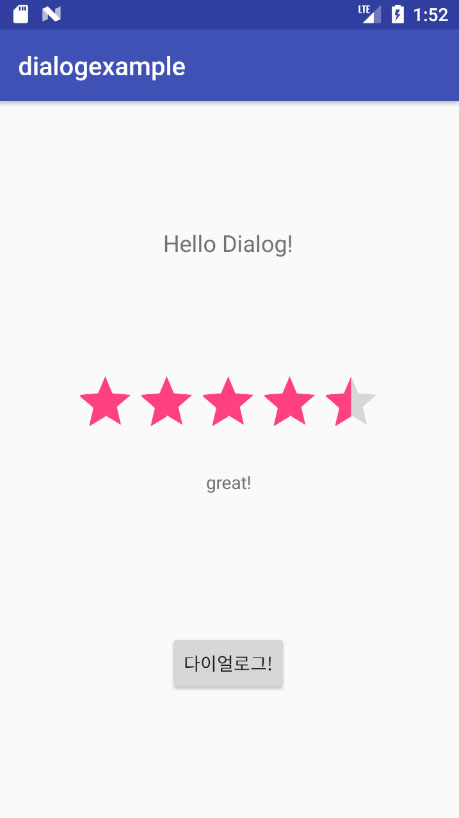
App을 실행시켜 버튼을 눌러 Dialog를 호출해보았다. 확인 버튼을 누르면 Dialog에 있던 text와 rating 값이 메인 액티비티에도 적용된다!
References
- https://developer.android.com/guide/topics/ui/dialogs.html
- http://gogorchg.tistory.com/entry/Android-RatingBar-touch-disable