[Android][Kotlin] 코틀린 ListView 리스트뷰
by Yena Choi
ListView가 안드로이드 공부 하면서 특히 어려운 부분인 것 같다. 예제 따라하기만 하다보니 머리가 아파서, 직접 예제를 만들고 한 단계씩 정리해보았다.
ListView
ListView는 스크롤 가능한 항목을 나타낼 때 사용되는 뷰 그룹이다. ListView에 먼저 View를 배치한 다음, 데이터가 저장된 곳에서 데이터를 View의 형식에 맞게 변환하여 가져온다.
안드로이드 리스트뷰를 사용하기 위해 준비해야 할 것을 정리하자면 다음과 같다.
- 데이터 클래스 정의
- 레이아웃에 ListView 추가
- item 생성
- 어댑터 생성
- 어댑터 설정
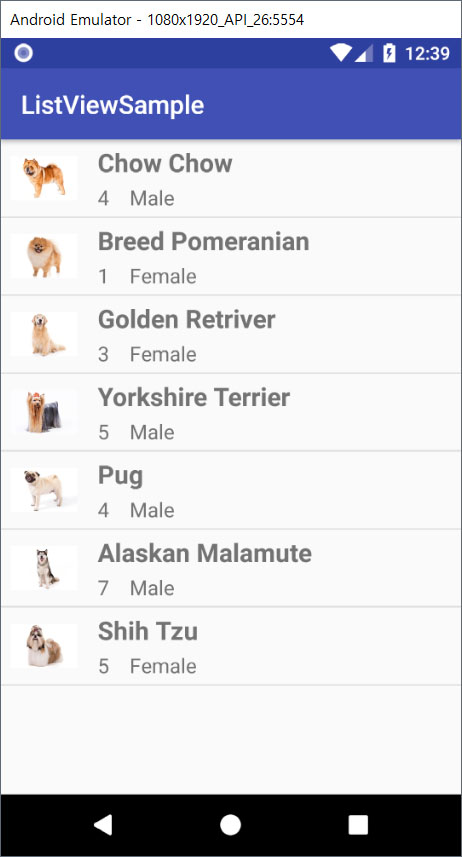
위와 같이 순서를 정하고, 리스트뷰 레이아웃 예제는 개의 리스트를 보여주는 화면으로 만들었다.
1. 데이터 클래스 정의
개의 목록을 만들 것이기 때문에, Dog.kt 클래스 파일을 만들었다. Dog의 구성요소를 breed, gender, age, photo로 설정했다. 여기서 photo는 drawable에 들어갈 이미지 파일의 이름이며, 이후에 이 변수를 통해 drawable에서 이미지를 불러올 수 있게 된다.
/* Dog.kt */

class Dog (val breed: String, val gender: String, val age: String, val photo: String)
그리고, 실제 변수를 초기화한 후 개의 목록을 가지고 있을 ArrayList를 MainActivity에 추가해준다. 우선 빈 ArrayList 하나를 생성한다.
/* MainActivity.kt*/

var dogList = arrayListOf<Dog>()
2. 레이아웃에 ListView 추가
메인 액티비티에서 작업했기 때문에 activity_main.xml에서 Palette - Containers - ListView 를 배치하고, 리스트뷰의 id를 mainListView로 지정했다.
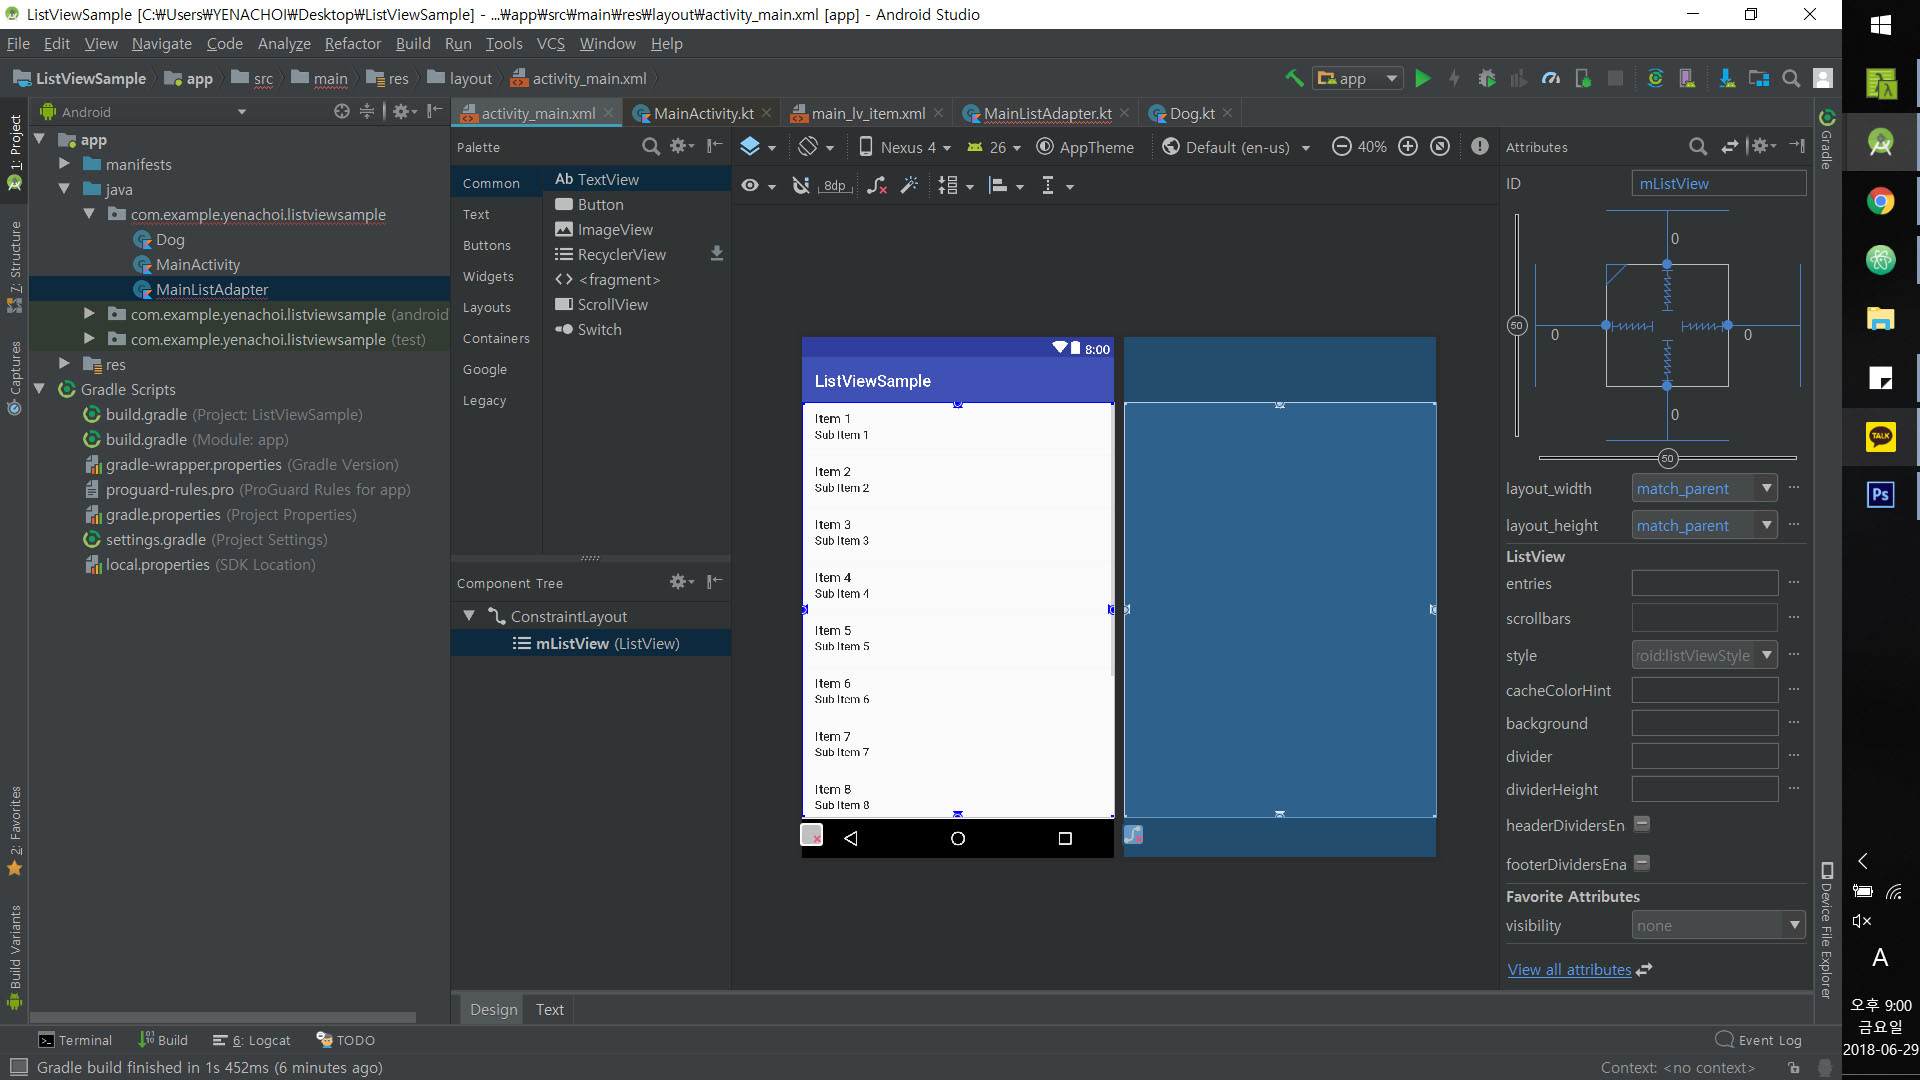
<?xml version="1.0" encoding="utf-8"?>
<android.support.constraint.ConstraintLayout xmlns:android="http://schemas.android.com/apk/res/android"
    xmlns:app="http://schemas.android.com/apk/res-auto"
    xmlns:tools="http://schemas.android.com/tools"
    android:layout_width="match_parent"
    android:layout_height="match_parent"
    tools:context=".MainActivity">

    <ListView
        android:id="@+id/mainListView"
        android:layout_width="match_parent"
        android:layout_height="match_parent"
        app:layout_constraintBottom_toBottomOf="parent"
        app:layout_constraintLeft_toLeftOf="parent"
        app:layout_constraintRight_toRightOf="parent"
        app:layout_constraintTop_toTopOf="parent">
    </ListView>
</android.support.constraint.ConstraintLayout>
3. item 생성
다음으로 ListView 안에서 항목 하나하나를 담당할 item을 만들었다. 여기서는 main_lv_item.xml 파일을 만들어서 왼쪽에 사진, 상단에 종류, 하단에 나이와 성별이 오도록 커스텀했다.
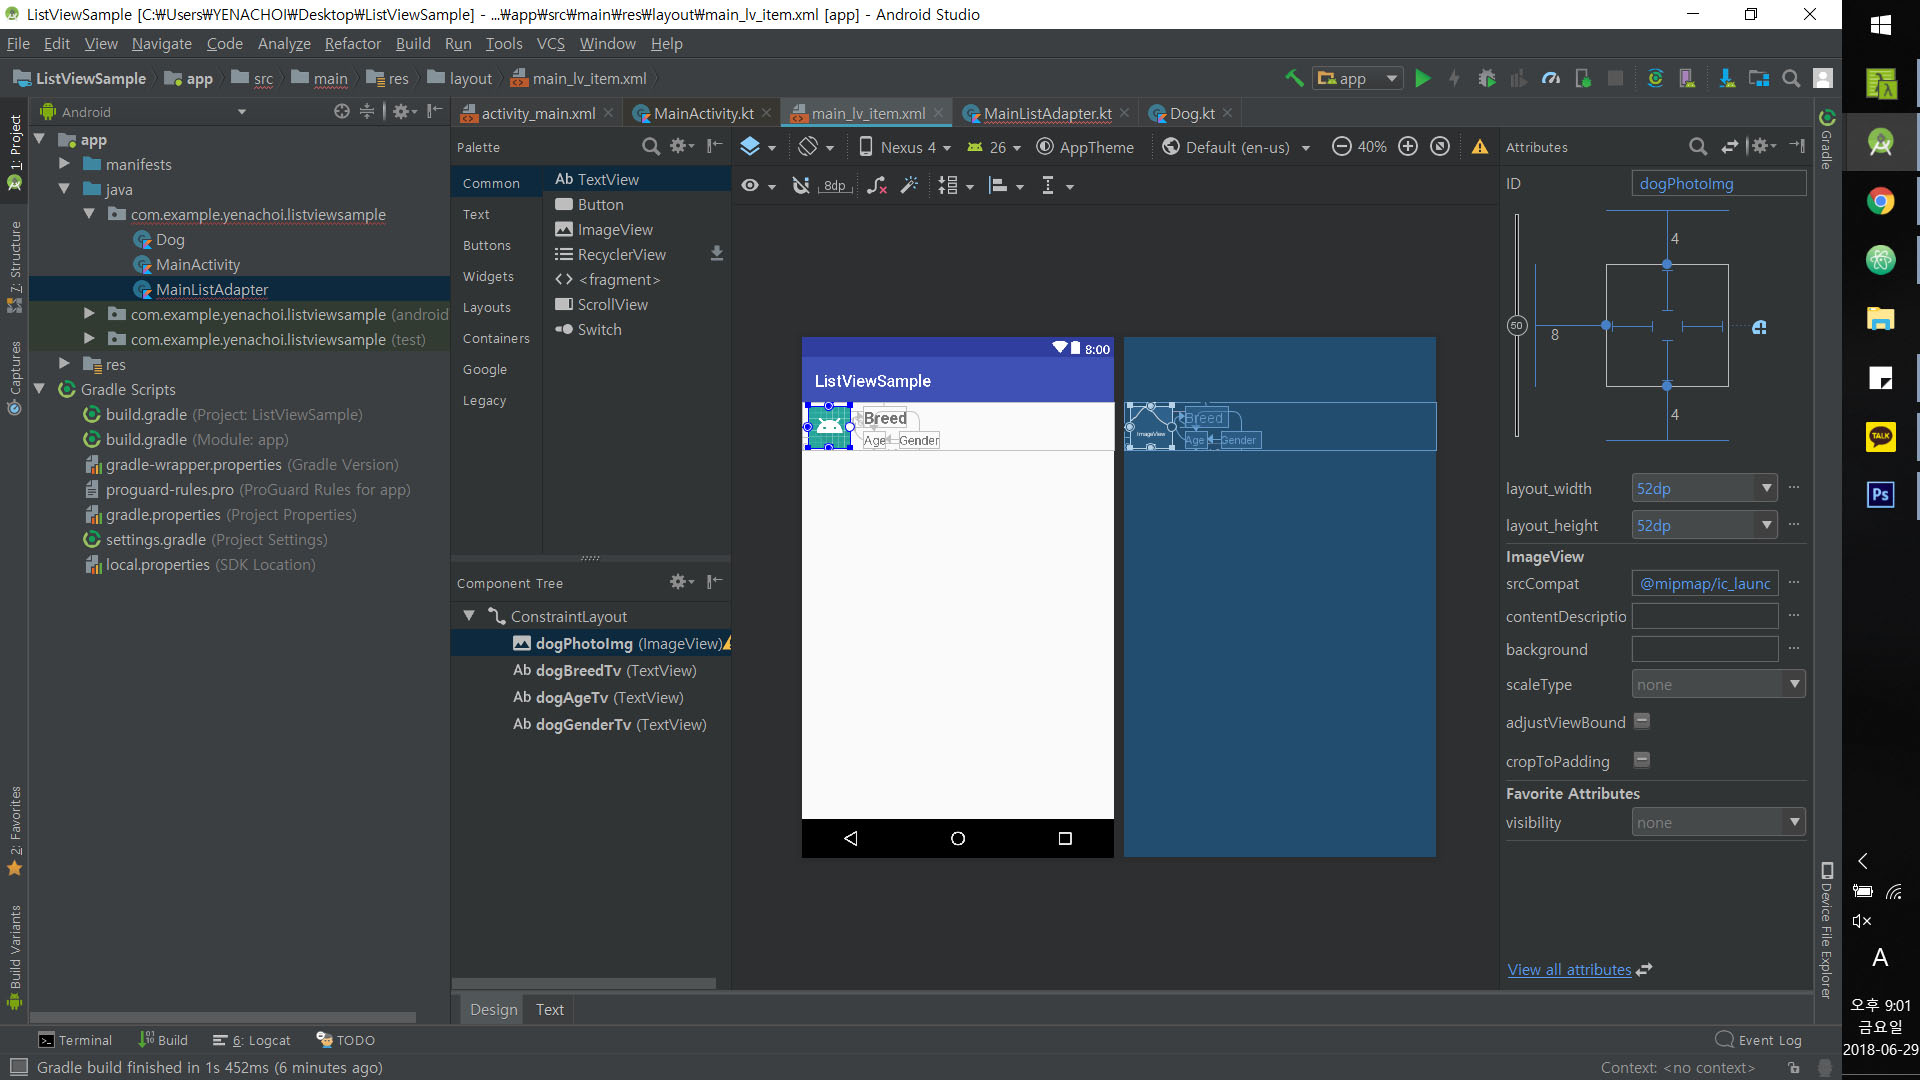
<?xml version="1.0" encoding="utf-8"?>
<android.support.constraint.ConstraintLayout xmlns:android="http://schemas.android.com/apk/res/android"
    android:layout_width="match_parent"
    android:layout_height="60dp"
    xmlns:app="http://schemas.android.com/apk/res-auto"
    xmlns:tools="http://schemas.android.com/tools">

    <ImageView
        android:id="@+id/dogPhotoImg"
        android:layout_width="52dp"
        android:layout_height="52dp"
        android:layout_marginBottom="4dp"
        android:layout_marginStart="8dp"
        android:layout_marginTop="4dp"
        app:layout_constraintBottom_toBottomOf="parent"
        app:layout_constraintStart_toStartOf="parent"
        app:layout_constraintTop_toTopOf="parent"
        app:srcCompat="@mipmap/ic_launcher_round" />

    <TextView
        android:id="@+id/dogBreedTv"
        android:layout_width="wrap_content"
        android:layout_height="wrap_content"
        android:layout_marginStart="16dp"
        android:textSize="20sp"
        android:textStyle="bold"
        app:layout_constraintStart_toEndOf="@+id/dogPhotoImg"
        app:layout_constraintTop_toTopOf="@+id/dogPhotoImg"
        tools:text="Breed"/>

    <TextView
        android:id="@+id/dogAgeTv"
        android:layout_width="wrap_content"
        android:layout_height="wrap_content"
        android:textSize="16sp"
        app:layout_constraintBottom_toBottomOf="@+id/dogPhotoImg"
        app:layout_constraintStart_toStartOf="@+id/dogBreedTv"
        tools:text="Age" />

    <TextView
        android:id="@+id/dogGenderTv"
        android:layout_width="wrap_content"
        android:layout_height="wrap_content"
        android:layout_marginStart="16dp"
        android:textSize="16sp"
        app:layout_constraintBottom_toBottomOf="@+id/dogAgeTv"
        app:layout_constraintStart_toEndOf="@+id/dogAgeTv"
        app:layout_constraintTop_toTopOf="@+id/dogAgeTv"
        tools:text="Gender" />

</android.support.constraint.ConstraintLayout>
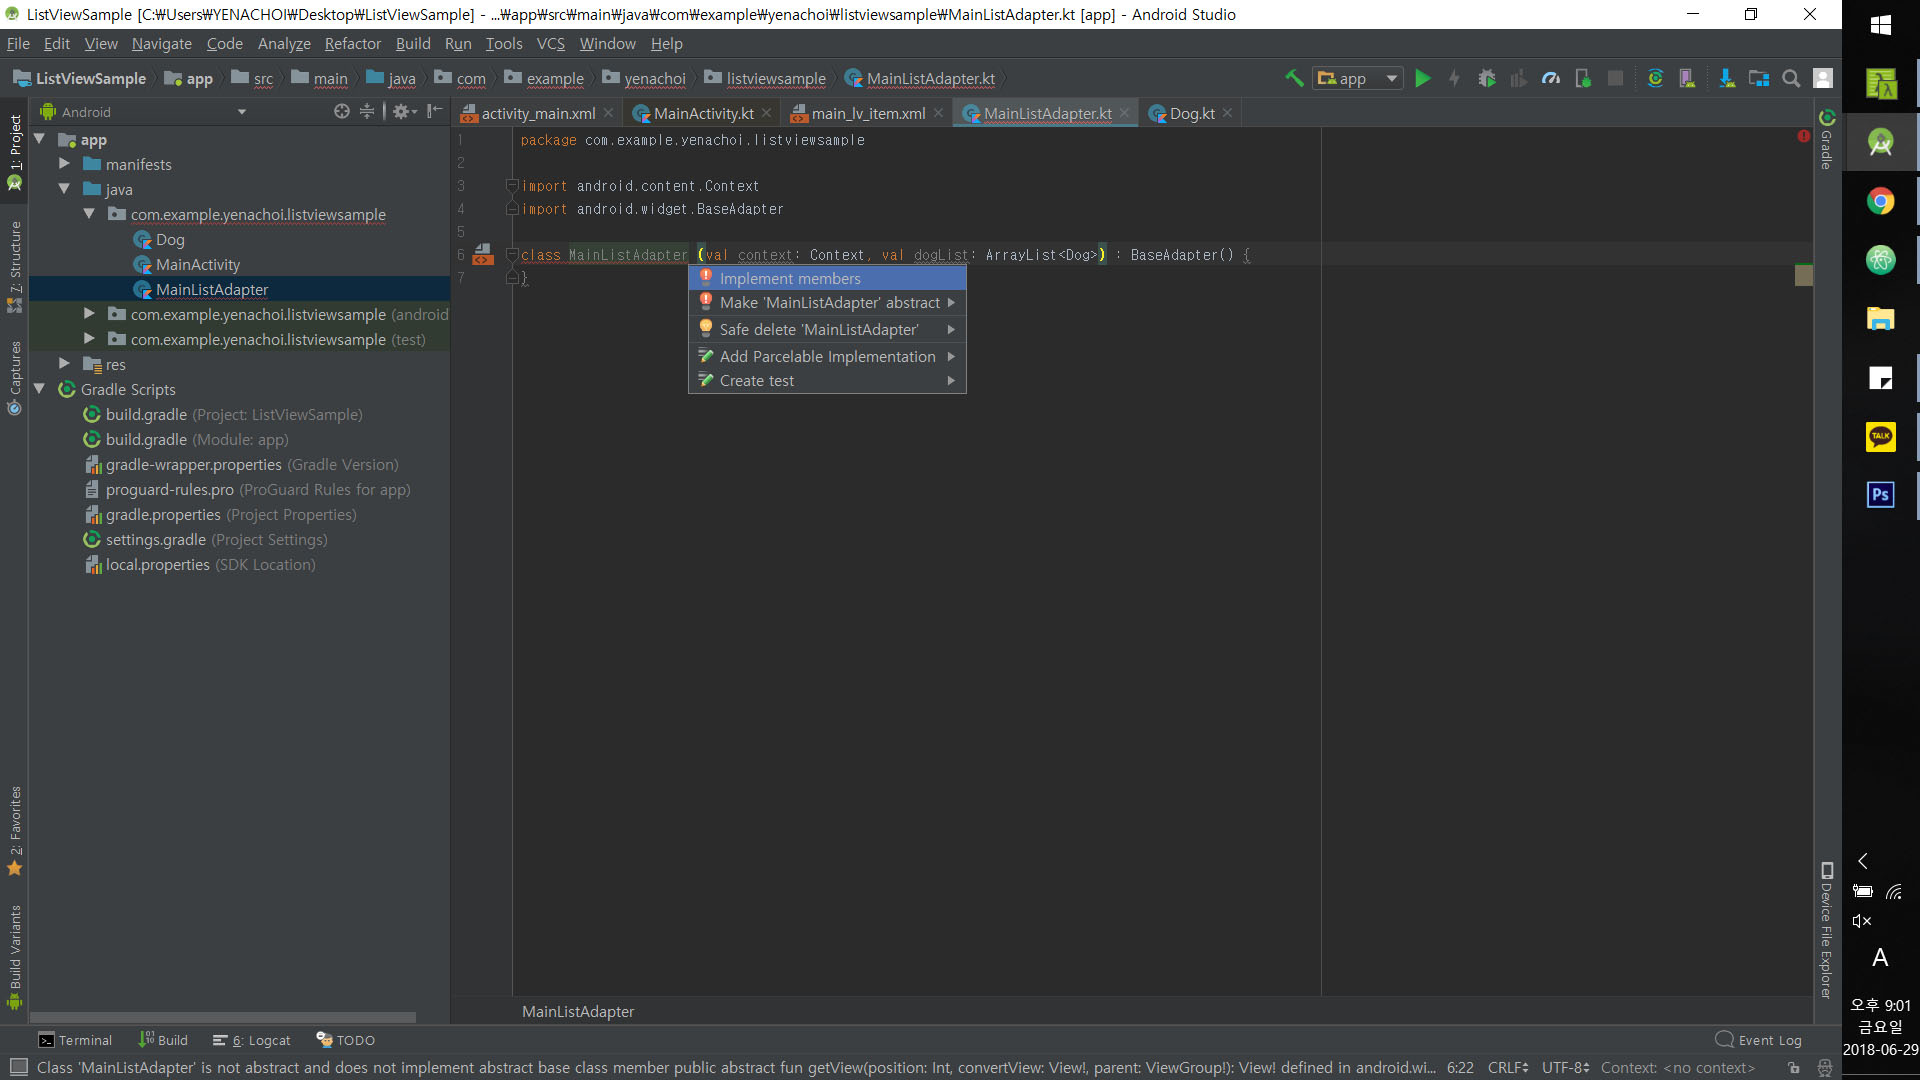
4. 어댑터 생성
ListView, ListView의 각 item, 그리고 거기에 넣을 데이터까지 설정했으면 Adapter를 만들어야 한다. 사진, 종류, 나이, 성별 등 어느 요소를 어느 View에 넣을 것인지 연결해주는 것이 Adpater의 역할이다. 새로운 클래스 파일을 만들고 context와 ArrayList<Dog> 파라미터를 추가한다.
/* MainListAdapter.kt */

class MainListAdapter (val context: Context, val dogList: ArrayList<Dog>) : BaseAdapter() {

}
임의로 Custom한 Adpater Class는 BaseAdapter()을 상속(extend)받는다. 그렇기에 기본적으로 4개의 함수를 implement 해야한다. 필수 함수가 없기 때문에 클래스 이름(MainListAdapter)에 오류 표시가 되어 있다. 마우스를 대고 Alt+Enter를 누르면 필수 메소드를 Override 할 수 있다.
Adapter에서 각 메소드가 담당하는 기능은 아래와 같다.
getView(Int, View ViewGroup): xml 파일의 View와 데이터를 연결하는 핵심 역할을 하는 메소드이다.getItem(Int): 해당 위치의 item을 메소드이다. Int 형식으로 된 position을 파라미터로 갖는다. 예를 들어 1번째 Dog item을 선택하고 싶으면 코드에서 getItem(0)과 같이 쓸 수 있을 것이다.getItemId(Int): 해당 위치의 item id를 반환하는 메소드이다. 이 예제에서는 실질적으로 id가 필요하지 않아서 0을 반환하도록 설정했다.getCount(): ListView에 속한 item의 전체 수를 반환한다.
이외에도 데이터 추가, 삭제나 변경 등의 기능을 하는 메소드도 추가할 수 있지만, 기본적으로 override 하는 메소드는 위의 4개이다.
최종적으로 완성되는 Adapter는 다음과 같다.
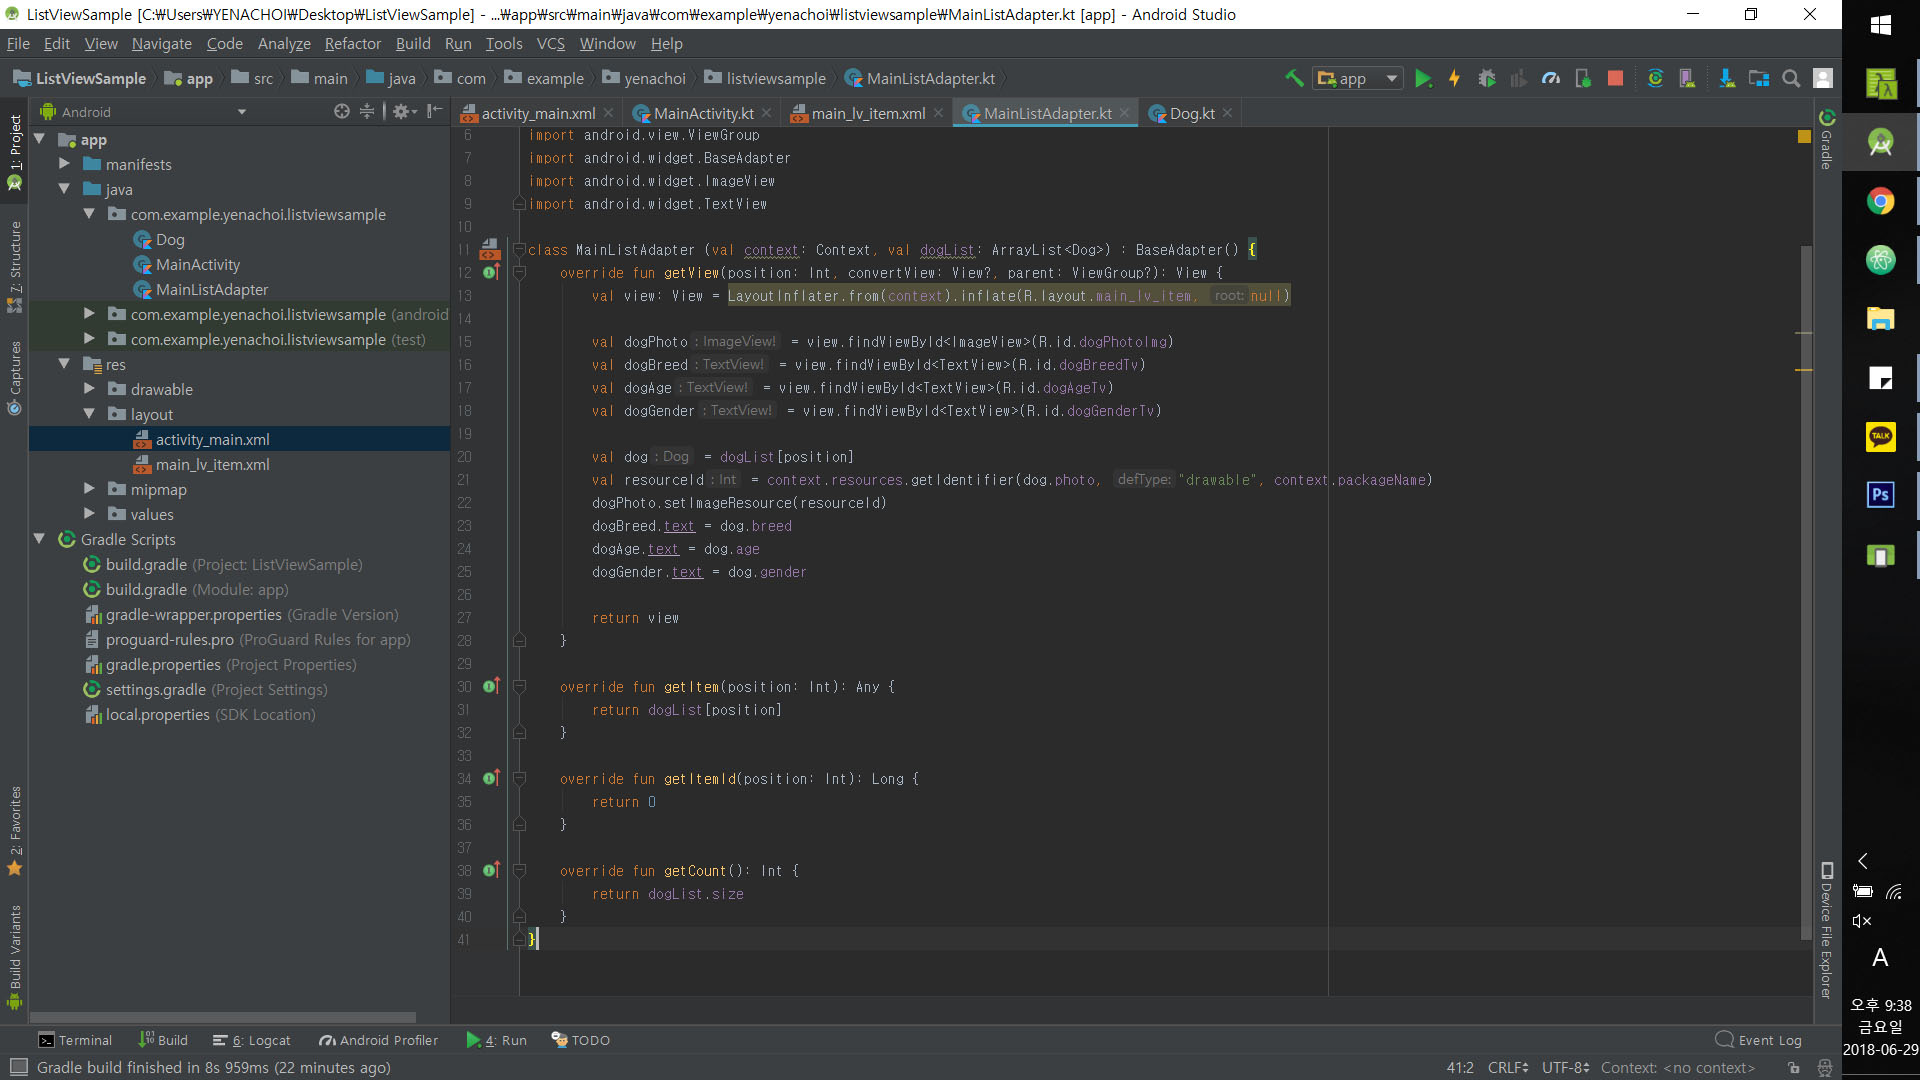
class MainListAdapter (val context: Context, val dogList: ArrayList<Dog>) : BaseAdapter() {
    override fun getView(position: Int, convertView: View?, parent: ViewGroup?): View {
        /* LayoutInflater는 item을 Adapter에서 사용할 View로 부풀려주는(inflate) 역할을 한다. */
        val view: View = LayoutInflater.from(context).inflate(R.layout.main_lv_item, null)

        /* 위에서 생성된 view를 res-layout-main_lv_item.xml 파일의 각 View와 연결하는 과정이다. */
        val dogPhoto = view.findViewById<ImageView>(R.id.dogPhotoImg)
        val dogBreed = view.findViewById<TextView>(R.id.dogBreedTv)
        val dogAge = view.findViewById<TextView>(R.id.dogAgeTv)
        val dogGender = view.findViewById<TextView>(R.id.dogGenderTv)

        /* ArrayList<Dog>의 변수 dog의 이미지와 데이터를 ImageView와 TextView에 담는다. */
        val dog = dogList[position]
        val resourceId = context.resources.getIdentifier(dog.photo, "drawable", context.packageName)
        dogPhoto.setImageResource(resourceId)
        dogBreed.text = dog.breed
        dogAge.text = dog.age
        dogGender.text = dog.gender

        return view
    }

    override fun getItem(position: Int): Any {
        return dogList[position]
    }

    override fun getItemId(position: Int): Long {
        return 0
    }

    override fun getCount(): Int {
        return dogList.size
    }
}
5. 어댑터 설정
정성들여 Adapter를 만들었다면, MainActivity.kt로 와서 Adapter를 초기화해야 한다. 그 후 ListView와 Adapter를 연결한다.
class MainActivity : AppCompatActivity() {

    var dogList = arrayListOf<Dog>()

    override fun onCreate(savedInstanceState: Bundle?) {
        super.onCreate(savedInstanceState)
        setContentView(R.layout.activity_main)

        val dogAdapter = MainListAdapter(this, dogList)
        mainListView.adapter = dogAdapter
    }
}
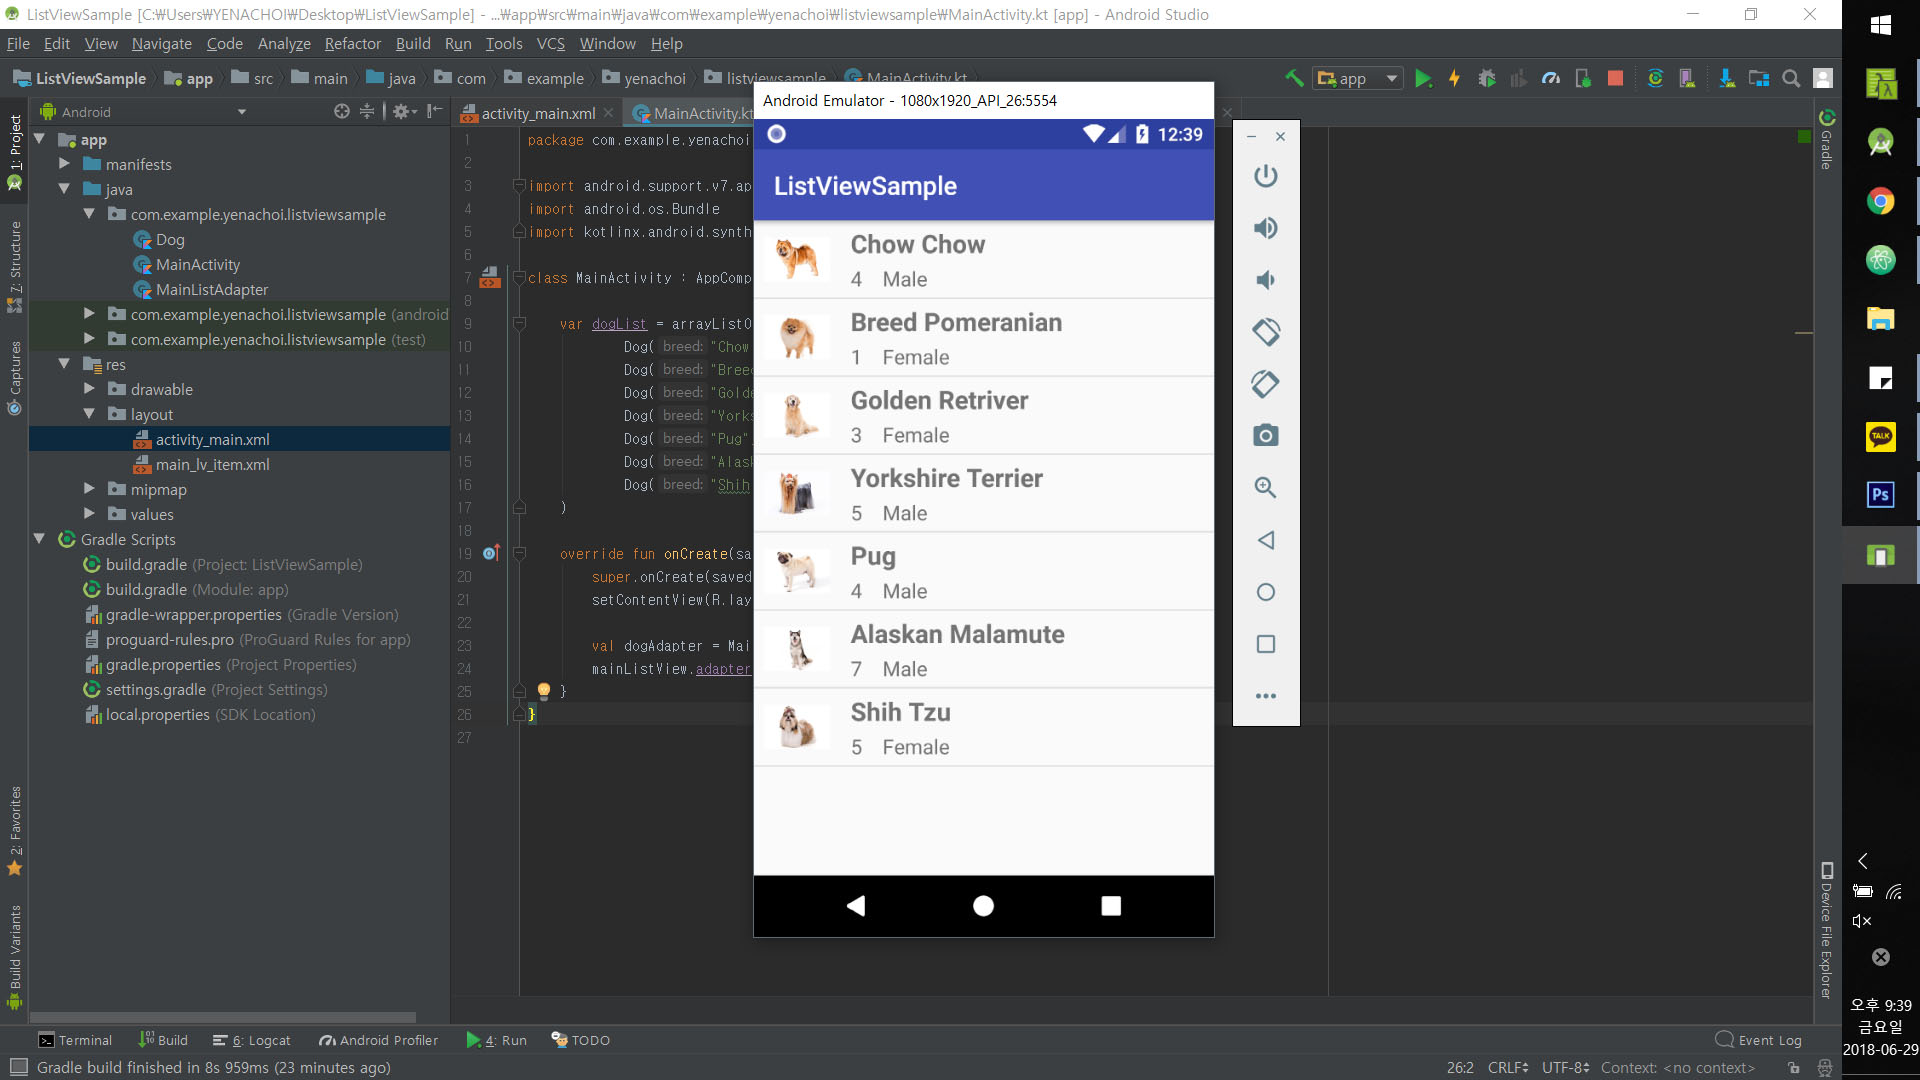
이로써 ListView가 완성됐지만, 실행해보면 아무런 결과도 나오지 않을 것이다. MainActivity에 있는 dogList에 데이터가 들어있지 않기 때문이다. 실제로는 리스트에 데이터를 추가하는 버튼 등을 만들어서 사용하겠지만, 우선은 임의의 데이터를 하드코딩해서 리스트가 제대로 뜨는지 확인해보았다. dogList에 데이터를 추가하고, drawable에 dog00.jpg, dog01.jpg 등의 리소스를 추가했다.
var dogList = arrayListOf<Dog>(
    Dog("Chow Chow", "Male", "4", "dog00"),
    Dog("Breed Pomeranian", "Female", "1", "dog01"),
    Dog("Golden Retriver", "Female", "3", "dog02"),
    Dog("Yorkshire Terrier", "Male", "5", "dog03"),
    Dog("Pug", "Male", "4", "dog04"),
    Dog("Alaskan Malamute", "Male", "7", "dog05"),
    Dog("Shih Tzu", "Female", "5", "dog06")
)
ListView 의 단점
ListView는 Adapter를 통해 getView 메소드를 호출하여 View를 만든다. 최초로 화면을 로딩한 후에도 스크롤을 움직이는 등 액션을 취하면 그 때마다 findViewById를 통해 convertView에 들어갈 요소를 찾는다. 스크롤 할 때마다 View를 찾으면 리소스를 많이 사용하게 되고, 속도가 느려진다.
Adapter를 생성하고 LayoutInflater를 설정할 때, 다음과 같이 주의 메세지가 뜬다.
Unconditional layout inflation from view adapter: Should use View Holder pattern (use recycled view passed into this method as the second parameter) for smoother scrolling
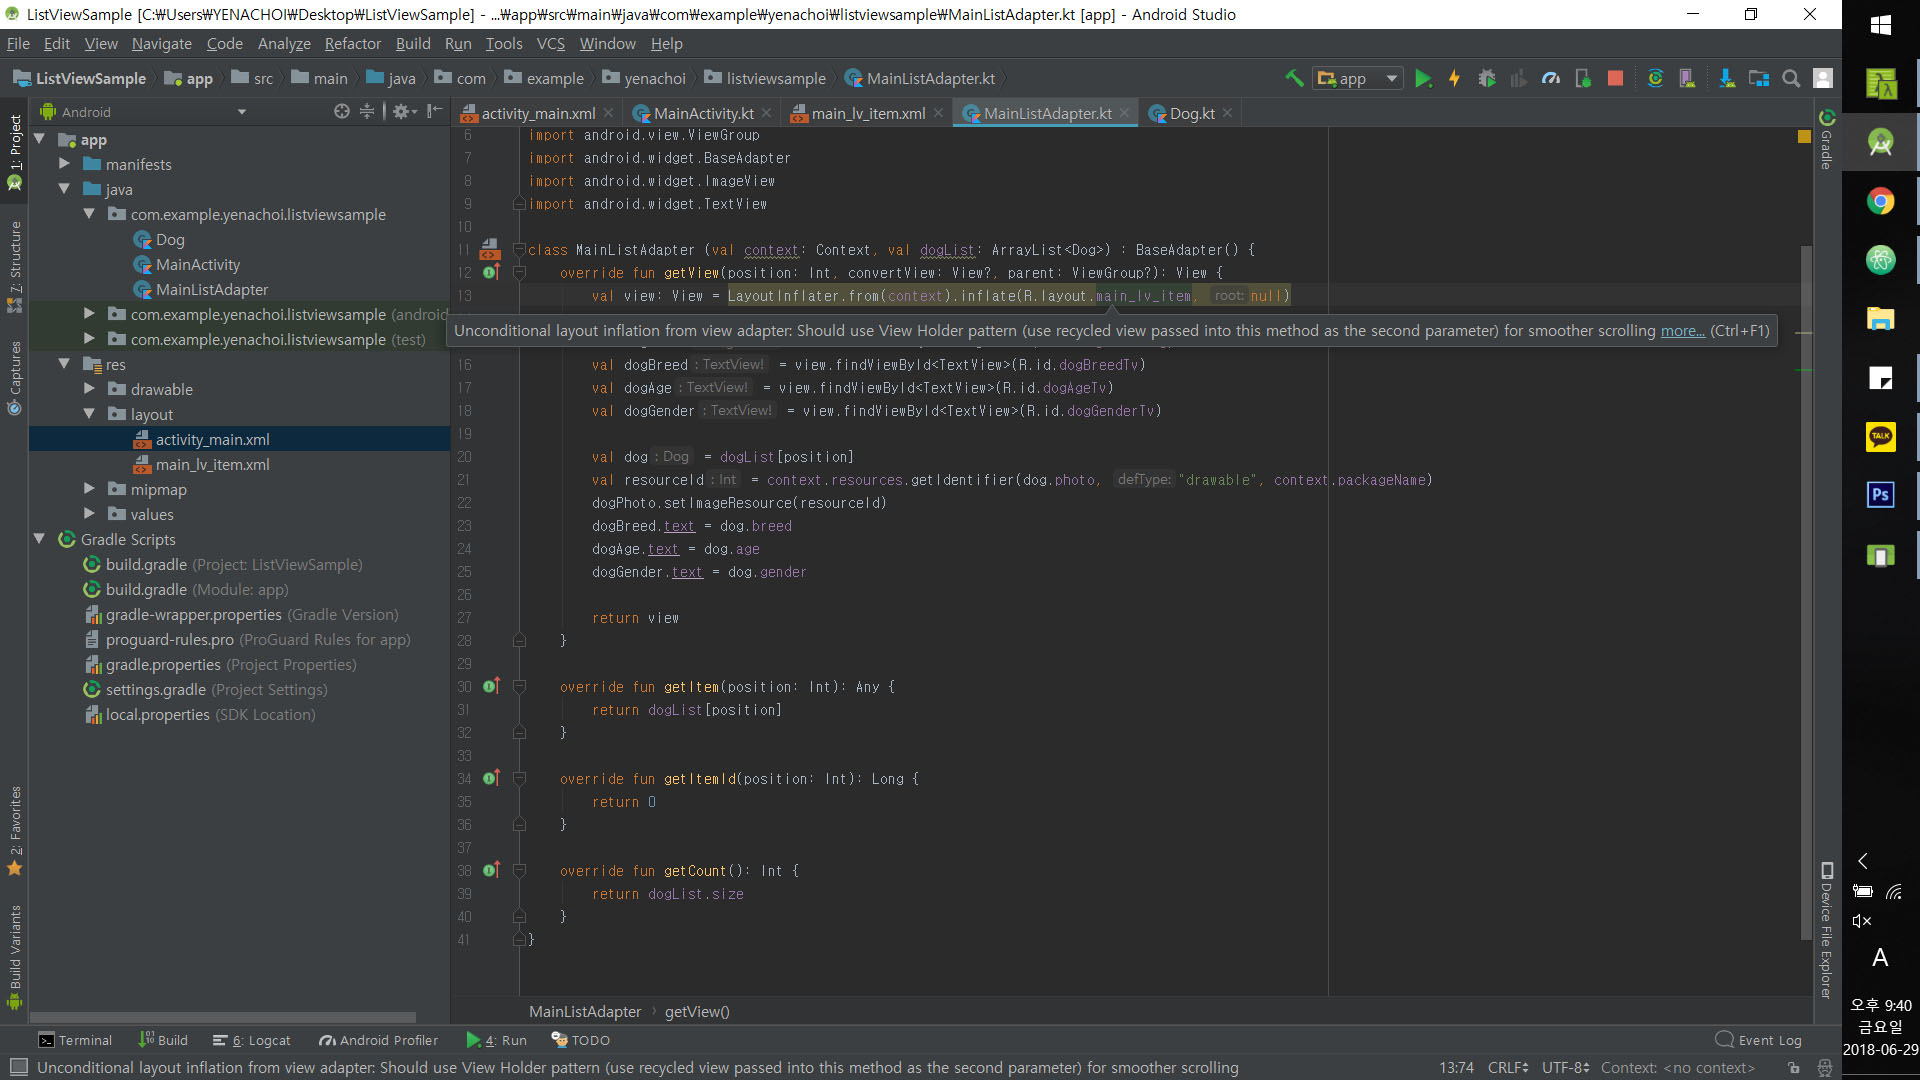
스크롤링 할때 조금 더 자연스러운 뷰를 보여주고 싶다면 View Holder를 사용하거나, 그 View Holder를 사용하도록 설계된 RecyclerView가 권장된다. 자세한 내용은 다른 포스트에 별도로 작성해 두었다.